
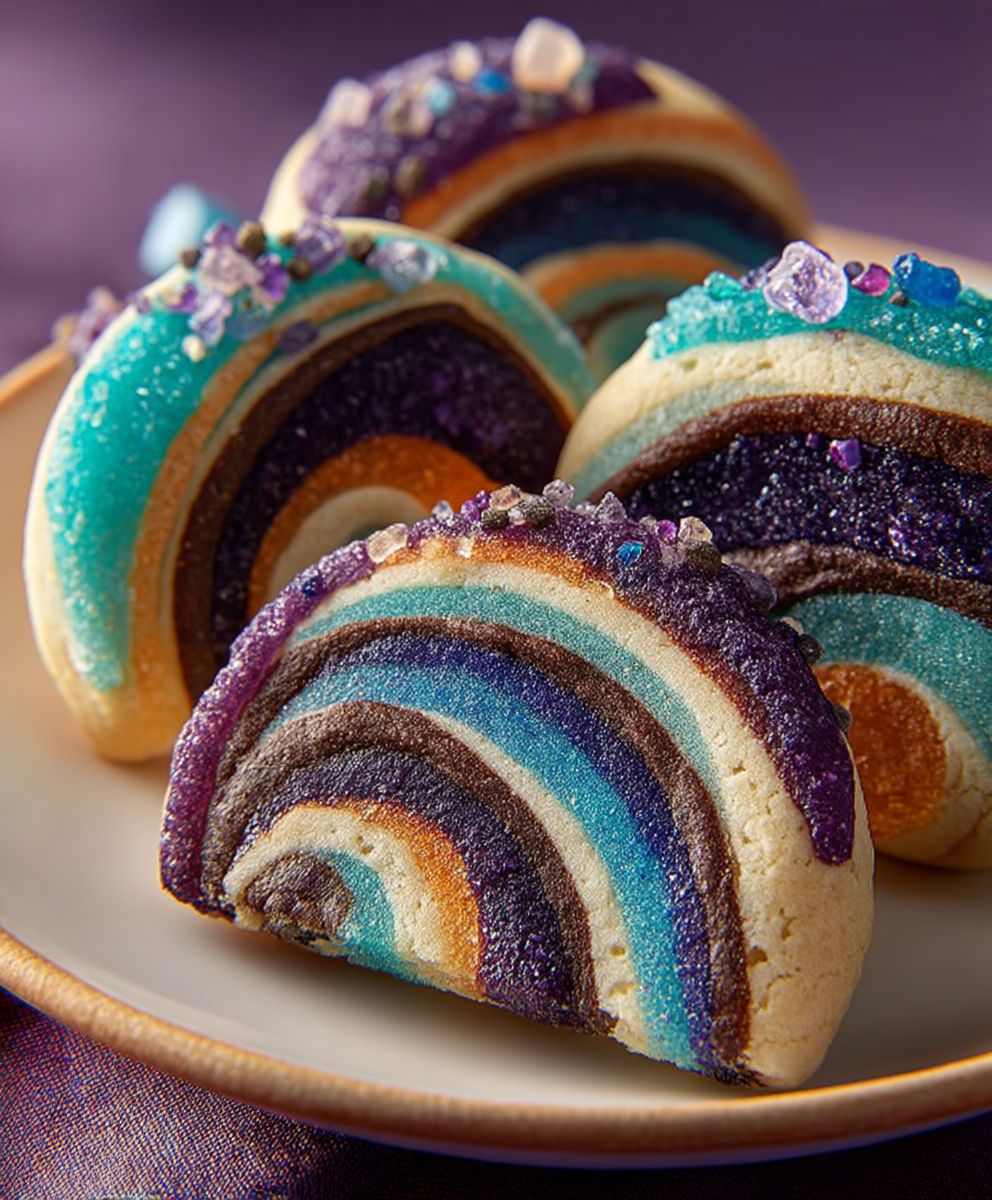
Remember that time you spent an entire weekend trying to achieve bakery-quality swirls, only to end up with oddly marbled blobs? Forget those kitchen disasters. These cookies are pure, delightful geometry and taste heavenly. The warm, buttery aroma wafting from your oven will announce the grand debut of the Magical Spiral Cookies: A Delightful Recipe for Sweet Treats, perfect for dazzling everyone.
This recipe provides simple, foolproof steps for achieving those mesmerizing pinwheel patterns that look far more complicated than they actually are. Prepare yourself for compliments, because these vibrant, crisp biscuits disappear astonishingly fast once they hit the cooling rack.
- The straightforward dough preparation makes this baking project simple enough for even the most hesitant beginner bakers to achieve perfection easily.
- Enjoy a perfect harmony of deep vanilla sweetness and a light, buttery crunch that melts delightfully in your mouth with every bite.
- Achieve stunning visual spirals in contrasting colors, transforming a simple sweet treat into edible art quickly and efficiently.
- These versatile cookies adapt beautifully to various natural food colorings, making them ideal for customizing treats for any holiday or party theme.
Ingredients for Magical Spiral Cookies: A Delightful Recipe for Sweet Treats
Here’s what you’ll need to make this delicious dish:
- All-Purpose FlourUse bleached or unbleached flour, ensuring you measure it correctly by spooning it into the cup rather than scooping directly from the bag.
- Unsalted ButterEnsure the butter is completely softened to room temperature, which is essential for creating a smooth, blendable dough texture.
- Granulated SugarThis provides the primary sweetness and structure; fine granulated sugar works best for uniform dissolution.
- EggUse one large egg, also at room temperature, which helps emulsify the fat and liquids, preventing the dough from separating.
- Vanilla PowderUse high-quality pure vanilla powder to enhance the rich, deep flavor profile of the buttery dough.
- Baking Powder and SaltThese leavening and seasoning agents ensure the cookies rise slightly and balance the sweetness effectively.
- Cocoa Powder (Unsweetened)This is used to create the contrasting dark portion of the spiral, providing a rich, subtle chocolate flavor.
- Milk or CreamA tablespoon of milk or cream may be necessary for the chocolate dough to match the texture consistency of the vanilla dough.
The full ingredients list, including measurements, is provided in the recipe card directly below.
How to Make Magical Spiral Cookies: A Delightful Recipe for Sweet Treats
Follow these simple steps to prepare this delicious dish:
Step 1: Preparing the Base Cookie Dough
In a large mixing bowl, cream together the softened butter and granulated sugar using an electric mixer until the mixture becomes light and fluffy, usually taking about three minutes. Beat in the egg and vanilla powder until fully incorporated. In a separate bowl, whisk together the flour, baking powder, and salt, then gradually add the dry mixture to the wet ingredients. Mix only until the dough just comes together; avoid overmixing.
Step 2: Dividing and Coloring the Dough
Divide the completed dough exactly in half. Leave one half as the standard vanilla dough. To the second half, incorporate the unsweetened cocoa powder. If the chocolate dough seems significantly stiffer or drier than the vanilla dough, add up to one tablespoon of milk or cream until the texture feels comparable to the vanilla half. Shape each colored dough into a flat disk, wrap them tightly in plastic, and refrigerate them for 30 minutes to firm up slightly.
Step 3: Rolling and Layering the Dough Sheets
Remove both dough disks from the refrigerator. Place the vanilla dough between two sheets of parchment paper and roll it into a neat rectangle, approximately 1/8-inch thick. Repeat this process with the chocolate dough, ensuring the resulting rectangle is roughly the same size as the vanilla rectangle. Carefully peel off the top layer of parchment paper from both. Lay the chocolate dough sheet directly on top of the vanilla dough sheet, pressing lightly to secure them together.
Step 4: Creating the Spiral Log and Chilling
Starting from one long edge, tightly roll the layered dough into a compact log. Use the bottom sheet of parchment paper to help guide the rolling and maintain tightness, ensuring there are no air gaps within the spiral. Once rolled, wrap the log tightly in plastic wrap and twist the ends to seal it securely. Place the dough log back in the refrigerator for at least three hours, or preferably overnight, allowing the butter to harden completely for easy slicing.
Step 5: Slicing and Baking the Cookies
Preheat your oven to 350°F (175°C). Line two baking sheets with parchment paper. Remove the chilled dough log from the refrigerator and use a sharp, non-serrated knife to slice the log into rounds about 1/4-inch thick. Place the sliced pinwheel treats onto the prepared baking sheets, leaving about two inches between them. Bake for 10 to 12 minutes, or until the edges begin to turn a light golden brown. Let them cool on the baking sheet for five minutes before transferring them to a wire rack.
Transfer to plates and enjoy the stunning visual appeal of these sweet spirals right away for the perfect finishing touch to any meal or gathering.
Essential Tips for Achieving Perfect Spirals
Mastering the pinwheel technique requires a little patience and attention to detail. These small adjustments guarantee your swirls are sharp, vibrant, and perfectly baked every single time.
Tips for the Perfect Spiral Roll
The success of the visual design rests entirely on the tightness of your roll and the temperature of your dough. When blending the two colors, slightly misting the surface of the bottom layer with a fine spray of water can help the top layer adhere without slippage, preventing gaps in the final baked cookie. When rolling the log, maintain steady, even pressure and try to keep the log straight rather than bowing in the middle. If the dough feels too soft or sticky at any point during the rolling, stop immediately, wrap it up, and return it to the freezer for 15 minutes before attempting to continue the process. This cold working environment is crucial for handling the buttery mixture.
Flavor and Color Variations
While the classic vanilla and chocolate combination is undeniably popular, these swirled biscuits offer incredible versatility. Instead of cocoa powder, try substituting it with vibrant, natural food colorings like beet powder for a festive red, or spirulina powder for a pale green swirl. You could also infuse the vanilla dough with citrus zest, such as lemon or orange, adding a bright, refreshing counterpoint to the traditional sweetness. For a spiced twist, try incorporating a teaspoon of cinnamon and a dash of nutmeg into the chocolate portion before rolling it up.
Storing and Serving Your Swirled Treats
Store these finished sweet treats in an airtight container at room temperature, where they will retain their crispness for up to one week. If you plan to make a large batch ahead of time, the unbaked dough log can be frozen for up to three months. Wrap the log first in plastic wrap and then aluminum foil to prevent freezer burn. When you are ready to bake, thaw the log in the refrigerator overnight before slicing and baking as instructed, adding a couple of minutes to the baking time if the slices are still very cold. Serving these with a simple glass of cold milk or a hot cup of tea elevates the entire experience.
Troubleshooting Common Cookie Mishaps
Even seasoned bakers encounter hiccups, especially when managing dough temperature and structure. Here are solutions to common problems faced when making rolled cookies.
Why Did My Dough Crumble?
Dough crumbling typically happens for two main reasons: it is either too cold or too dry. If your dough is too cold, let it sit on the counter for five to ten minutes to slightly warm up before attempting to roll it out, which increases the elasticity. If the dough feels inherently dry even at room temperature, it may need more liquid. Add half a teaspoon of milk at a time, kneading gently until the dough is smooth and pliable enough to roll without cracking excessively at the edges. Remember that accurately measured flour is key to preventing dryness.
How to Prevent Spreading During Baking
Cookie spreading occurs when the butter melts too quickly before the flour structure has time to set. The best defense is ensuring the dough is extremely cold before it enters the oven. If your kitchen is warm or if you handled the dough extensively during slicing, place the cut cookies on the baking sheet and chill them in the refrigerator for 15 minutes immediately before baking. Additionally, using parchment paper helps regulate heat distribution, and always ensure your oven temperature is accurate.
Frequently Asked Questions
Addressing these common queries helps ensure your experience making these delightful sweets is smooth and successful from start to finish.
Can I substitute the butter with a non-dairy alternative?
Yes, you absolutely can substitute butter with a high-quality, plant-based stick margarine or shortening. Be aware that the texture might be slightly different, potentially resulting in a slightly softer cookie, but the overall flavor profile will remain excellent.
How do I get my dough rectangles exactly the same size?
The easiest method is to use a rolling pin with adjustable thickness guides, which ensures uniform thickness. Once rolled, use a ruler and a sharp knife or pizza cutter to trim both sheets into precise rectangles before stacking them, minimizing waste and ensuring even spirals.
What if I don’t have time to chill the dough for three hours?
If you are short on time, you can accelerate the chilling process by placing the wrapped dough log in the freezer for 45 to 60 minutes. The core objective is achieving a log that is firm enough to slice cleanly without squishing the spiral design, which is essential for these Magical Spiral Cookies: A Delightful Recipe for Sweet Treats.
Can I freeze the baked cookies?
Yes, these baked cookies freeze well. Allow them to cool completely, then place them in a single layer in an airtight freezer bag or container, separating layers with parchment paper. They will maintain quality for up to six weeks; thaw them at room temperature before serving.
The Quest for the Perfect Swirl
I once tried to make a visually stunning cookie and ended up with something resembling a modern art interpretation of a melted clock. It was delicious, yes, but certainly not Instagram-worthy. Years of trial, error, and flour dusting later, I finally perfected the technique that brings us to these stunning creations: theMagical Spiral Cookies: A Delightful Recipe for Sweet Treats. These aren’t just cookies; they are edible illusions, guaranteed to elicit an “ooh” or “ahh” from even the most jaded dessert critics.
The beauty of the spiral cookie lies in the contrast between the two doughs. We need a rich, buttery base for both the vanilla and the cocoa portions. The trickiest part is ensuring the texture is perfect for rolling. Too sticky, and you’ll have a chaotic mess. Too dry, and it cracks when you try to roll the log. We are aiming for a smooth, pliable texture, similar to playdough that’s been warmed slightly by the sun. Don’t rush the chilling process; patience is the secret ingredient here. Skipping the required rest period in the refrigerator often results in flat, sad cookies instead of tall, proud spirals.
Unlocking the Secrets of the Dough
The secret to achieving sharp, beautiful stripes lies entirely in temperature control and precision stacking. This recipe requires two separate doughs—one flavored with classic vanilla and the other rich with deep cocoa. Once you master the simple technique of layering and rolling, you’ll find yourself adapting this delightful recipe for sweet treats for every season, switching colors and extracts easily. Remember, every step of this process is designed to maximize the visual appeal of the final product, turning a standard sugar cookie into a mesmerizing pinwheel.
Gathering Your Ingredients for Sweet Success
- 2 cups all-purpose flour
- 1 teaspoon baking powder
- 1/4 teaspoon salt
- 1 cup (2 sticks) unsalted butter, softened
- 1 cup granulated sugar
- 1 large egg
- 1 teaspoon pure vanilla powder (split between the two doughs)
- 2 tablespoons unsweetened cocoa powder (use Dutch-processed for richer color)
The Art of the Pinwheel: Step-by-Step Instructions
Begin by whisking the flour, baking powder, and salt together in a medium bowl. Set this aside. In a large bowl, cream the softened butter and sugar together using an electric mixer until the mixture looks pale and fluffy. Beat in the egg and the vanilla powder. Gradually add the dry ingredients to the wet mixture, mixing only until just combined. Be careful not to overmix, which leads to tough cookies.
Now, divide the dough exactly in half. Place one half back into the mixing bowl. To the second half, add the cocoa powder and 1/4 teaspoon of vanilla powder, mixing thoroughly until the color is uniform dark brown. Wrap both the vanilla and chocolate doughs separately in plastic wrap and chill them in the refrigerator for a minimum of one hour. This step is non-negotiable for stable spirals!
Once chilled, place the vanilla dough between two large sheets of parchment paper. Using a rolling pin, roll it out into a rectangle approximately 12 inches by 8 inches. Repeat this exact process with the chocolate dough. Brush the surface of the vanilla dough lightly with water or a tiny bit of beaten egg white, then carefully place the chocolate rectangle directly on top of the vanilla dough, pressing gently to make sure they adhere without air pockets.
Starting from one of the long edges, roll the combined dough tightly into a seamless log. It must be rolled firmly to avoid gaps, which ruin the spiral pattern. Wrap the log tightly again in plastic wrap and chill it for another two hours—or even better, overnight. This second chill sets the shape permanently.
Finally, preheat your oven to 350°F (175°C). Use a sharp, non-serrated knife to slice the chilled log into uniform 1/4-inch thick rounds. Arrange these beautiful pinwheels on a baking sheet lined with parchment paper. Bake for 10 to 12 minutes, or until the edges are lightly golden. Allow them to cool on the tray for a couple of minutes before transferring to a wire rack. Step back and admire your handiwork—you’ve createdMagical Spiral Cookies!
Why the Chill Time Is Non-Negotiable
I know, I know. Waiting is hard. Especially when the promise of a delicious cookie is just hours away. However, impatience is the nemesis of the spiral cookie. The chilling process serves two vital purposes. First, it allows the fat (butter) to solidify completely. When that butter hits the hot oven, it melts slower, preventing the cookie from spreading out into a thin, shapeless puddle. Instead, it rises slightly, maintaining that beautiful thick structure. Second, chilling integrates the two layers.
If the dough is too soft, trying to roll the log results in a squashed, distorted mess where the chocolate and vanilla blur into a muddy brown stripe. If you respect the chill time, you respect the spiral. Furthermore, proper chilling ensures that when you slice the dough, you get clean, precise cuts, which translate into the defined stripes that give these cookies their truly magical appeal.
Troubleshooting Common Spiral Cookie Problems
Baking can be fickle, especially when dealing with complex structures like this. What if your dough cracks while rolling? The simple answer is that it is too cold. Let it rest for five to ten minutes on the counter to warm up slightly and increase flexibility. What if the dough log flattens during the final chill? This usually means you didn’t wrap it tightly enough. Ensure the plastic wrap is pulled taut around the log, acting like a corset to keep the shape perfectly round.
If you find your spirals look distorted after baking, your oven temperature might be fluctuating, or you sliced the cookies unevenly. Use a sharp, non-serrated knife and aim for uniform 1/4-inch slices for professional results. These cookies are designed for visual impact, so precision really matters during the slicing phase. Think of yourself as a pastry architect, meticulously crafting each slice to reveal the beautiful design within. While the prep work involves some patience, the reward—a delightful recipe for sweet treats—is absolutely worth the effort.
Perfecting the Cooking Process

For the best spirals, follow this essential sequence: prepare both doughs simultaneously, ensuring even mixing. Then, enforce the mandatory first chilling period. Roll both doughs out flat and stack them immediately before the second, crucial chilling phase. Only slice and bake when the log feels rock hard, guaranteeing sharp, defined stripes.
Add Your Touch
Feel free to experiment with flavor. Swap out cocoa powder for finely ground coffee or even a teaspoon of warming spices like cardamom for the dark layer. Alternatively, color the vanilla dough with a few drops of natural food coloring to create vibrant red or blue spirals, transforming these delightful cookies for holidays or themed parties.
Storing & Reheating
Store leftoverMagical Spiral Cookiesin an airtight container at room temperature for up to five days. If you need to make them ahead, the unbaked dough log freezes beautifully for up to three months. Thaw it slightly before slicing, then bake as directed, ensuring you always enjoy the crisp edges and tender centers.
Expert Baking Tips for the Perfect Swirl
- Always use cold butter initially for creaming, then let it soften slightly before mixing. This controls gluten development and prevents dense cookies.
- If your dough cracks while rolling, let it sit for five minutes at room temperature. The slight warmth will increase its elasticity for easier manipulation.
- For super-defined lines, chill the rolled and stacked dough log in the freezer for 30 minutes just before slicing. This maintains structural integrity.
When I first served these cookies, my niece swore I had used a miniature pastry machine to create the stunning patterns; she couldn’t believe these delightful sweet treats were handmade. That’s when I knew they were ready.
Frequently Asked Questions About Spiral Cookies
Can I make the cookie dough ahead of time?
Absolutely. You can prepare both doughs, stack them, roll them into a log, and keep the tightly wrapped log refrigerated for up to four days before slicing and baking. This makes entertaining incredibly easy!
Why do my cookies lose their shape during baking?
Shape loss is almost always related to butter temperature. If the butter was too soft when mixing, or if the dough log was not chilled sufficiently before slicing, the cookies will spread excessively in the oven. Ensure the log is very firm when it goes under the knife.
Can I substitute ingredients in this recipe?
While baking requires precise measurements, you can safely substitute the vanilla powder with other clear flavors, like almond or lemon extract. For the fat content, stick to real butter, as margarine or shortening can alter the texture and spiral definition significantly.
How can I achieve a darker chocolate color?
To intensify the chocolate hue without altering the overall flavor profile, use a high-quality, Dutch-processed cocoa powder. This type of cocoa typically offers a deeper, richer color compared to standard baking cocoa and helps accentuate the spiral.
The Legend of the Swirling Sweet Treat
There is nothing quite like presenting a plate of cookies that look incredibly complicated, only to reveal later that they required approximately the same amount of effort as microwaving a bag of popcorn. I remember years ago attempting fancy lattice pies and delicate French pastries. The results were universally disastrous, often ending up looking like abstract modern art or, worse, something the cat dragged in.
That is why I absolutely adore this recipe. These beautiful spirals, which look like they came straight from a professional bakery, are shockingly simple to execute. They have the power to stop conversations and elicit gasps of pure delight—which is why I christened them these delightful sweet treats. Forget hours of meticulous labor; the secret here lies entirely in the chilling time. Get ready to fool all your friends into believing you are a domestic genius.
Essential Ingredients for Magical Spiral Cookies
You probably have 90% of these ingredients lurking in your pantry right now. This recipe requires standard cookie components, but the magic happens when we introduce contrast, usually through a high-quality cocoa powder or vibrant food coloring.
The Dry Foundation
- 2 ½ cups all-purpose flour
- 1 teaspoon baking powder
- ½ teaspoon salt
The Wet Magic
- 1 cup (2 sticks) unsalted butter, softened
- 1 cup granulated sugar
- 1 large egg
- 2 teaspoons pure vanilla powder
The Contrast Agents
- ¼ cup unsweetened cocoa powder (or 1 teaspoon of gel food coloring, like red or blue)
- 2 teaspoons milk or water (optional, only if using cocoa powder)
The Secret Technique to Perfect Swirls
Achieving the clean, mesmerizing spirals of these delightful treats requires patience, primarily during the chilling phases. Do not rush the refrigeration; the structural integrity of the log depends on it!
Phase 1: Dough Creation and Division
In a large bowl, use a stand mixer or hand mixer to cream the softened butter and sugar until the mixture appears light and fluffy. This typically takes about three minutes. Add the egg and vanilla powder, mixing until just combined. Slowly incorporate the flour, baking powder, and salt mixture until a shaggy dough forms. Be careful not to overmix the dough at this stage.
Divide the completed dough evenly into two separate portions. I find it easiest to use a kitchen scale to ensure the halves are perfectly balanced for uniform spirals.
Phase 2: Coloring the Canvas
Now it’s time to create the visual contrast that makes these Magical Spiral Cookies so striking. Leave one half of the dough plain (the vanilla portion). To the second half, mix in the cocoa powder. If the dough becomes too dry and crumbly after adding the powder, you can mix in the optional milk or water, one teaspoon at a time, until the dough reaches the same pliable consistency as the vanilla dough. If you are using gel food coloring instead of cocoa powder, knead the gel directly into the second dough portion until the color is vibrant and evenly distributed.
Phase 3: Rolling, Stacking, and the Nap
This step is where the spiral is born. Place each dough portion between two sheets of parchment paper. Roll each dough into an identical rectangle, roughly 12 inches by 9 inches, and about 1/8 inch thick. Peel the top sheet of parchment from both rectangles.
Now, carefully stack the colored rectangle directly on top of the plain rectangle. If the dough is too stiff to stick together, lightly brush the vanilla layer with a small amount of water or a beaten egg white before stacking the colored dough on top. Trim the edges of the stacked dough to create sharp corners.
Starting from the long edge, roll the stacked dough tightly into a log, using the parchment paper to assist you in keeping the roll firm and compact. Once rolled, wrap the log tightly in plastic wrap. Refrigerate the dough log for at least 4 hours, or ideally overnight. This extended nap ensures the log is solid enough for clean slicing.
Phase 4: Baking These Delightful Sweet Treats
Preheat your oven to 350°F (175°C). Line two baking sheets with parchment paper. Remove the chilled log from the refrigerator and unwrap it. Using a very sharp, non-serrated knife, slice the dough into cookies approximately ¼ inch thick. If the log starts to soften, return it to the fridge for 15 minutes before continuing.
Place the sliced cookies onto the prepared baking sheets, leaving about 2 inches between each cookie. Bake for 10 to 12 minutes, or until the edges are lightly golden and set. Let them cool on the baking sheet for five minutes before transferring them to a wire rack to cool completely. Prepare for the compliments!
Conclusion for Magical Spiral Cookies: A Delightful Recipe for Sweet Treats
These Magical Spiral Cookies truly deliver on their promise: a visually stunning dessert that requires minimal active cooking time. By mastering the art of chilling and precise slicing, you unlock the ability to create dazzling patterns that taste as good as they look. This recipe is perfect for seasonal variations, gifting, or simply elevating your everyday snack routine. Remember, the key to success lies in patience during the rest phases. Go forth and amaze your friends with these delightful sweet treats, proving that the most impressive bakes are often the easiest ones to execute!
FAQs
How do I ensure my Magical Spiral Cookies maintain their shape during baking?
The single most crucial factor for maintaining the distinct spiral shape is ensuring adequate chilling time before slicing and baking. The dough log must be rock-solid when you cut it. If you try to slice the log while it is still soft, the dough will squash, distorting the beautiful circular pattern. Also, make sure your oven temperature is accurate; an oven that runs too hot can cause the cookies to spread prematurely, losing their crisp edges and definition. Always slice the cookies uniformly for the best results.
Can I prepare the dough for these spiral treats ahead of time?
Absolutely! Preparing the dough ahead of time is one of the best features of this recipe for sweet treats. Once the dough log is rolled and tightly wrapped in plastic, you can store it in the refrigerator for up to three days. For longer storage, you can freeze the log for up to two months. If freezing, be sure to double-wrap it in foil or an airtight freezer bag. When ready to bake, thaw the log overnight in the refrigerator before slicing and baking as directed. This makes entertaining stress-free.
What is the best way to substitute ingredients in this delightful recipe for sweet treats?
While the proportions of butter, sugar, and flour are key to the texture of these cookies, minor substitutions are possible. You may swap granulated sugar for fine brown sugar for a slightly chewier result, but avoid liquid sweeteners which change the dough structure entirely. If you need a gluten-free option, use a high-quality 1:1 gluten-free baking blend that contains xanthan gum. For the flavor contrast, instant coffee powder can substitute cocoa for a mocha spiral, but ensure you dissolve it in a tiny amount of milk first.
Why did my cookies crumble when I tried to slice the log?
If your cookie log crumbles during slicing, it usually indicates that the log is too cold and rigid, or the dough was under-mixed initially. If it is too hard, let the log sit at room temperature for five to ten minutes to temper slightly before slicing. Use a large, sharp chef’s knife and slice with firm, quick motions rather than sawing. If the crumbles were excessive, the initial dough might have been too dry; ensure your flour measurements were precise, or add a teaspoon more butter or milk next time.

Leave a Comment