
The alarm clock is the arch-nemesis of Sunday morning bliss, but the smell of warm sugar can silence any digital tyranny. Today, we’re defeating dull breakfasts with a touch of elegance and a lot of buttery goodness. Get ready for the trulyIrresistible Red Velvet Cinnamon Rolls – Sweet and Soft Breakfast Recipethat will make you look like a pastry wizard. These rolls possess a magical ability to stop conversation mid-sentence. They are fluffy, vibrant, and exactly the comfort food your soul needs right now, promising sweet, soft perfection in every bite.
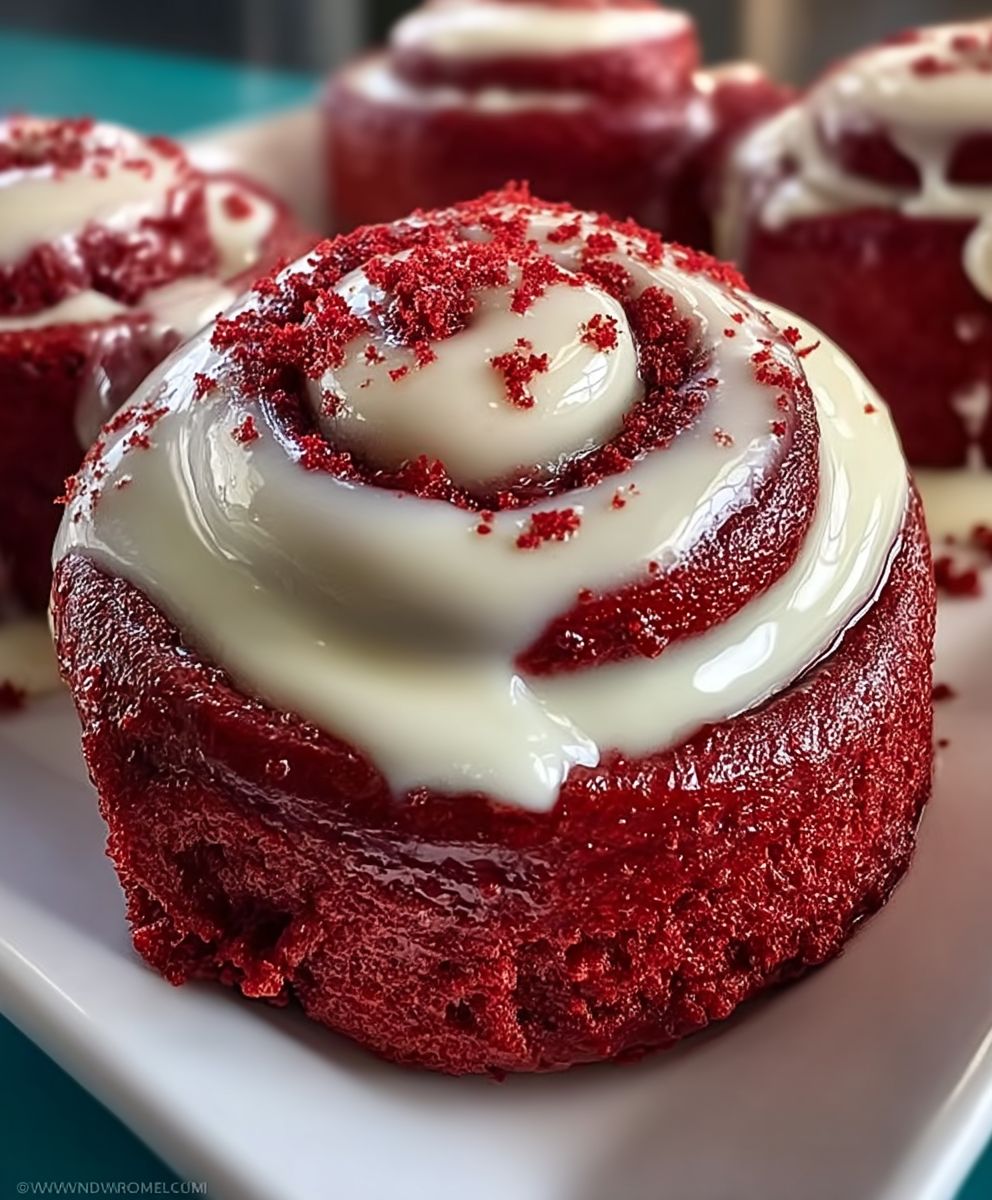
- The stunning crimson color and swirls of cream cheese frosting elevate these rolls from standard breakfast fare to a visually spectacular brunch centerpiece.
- Achieve bakery-quality softness using simple techniques and readily available pantry items, proving that amazing pastries don’t require professional training.
- This recipe offers a complex flavor profile, marrying the subtle tang of buttermilk with rich cocoa and a bright, sweet finish from the vanilla glaze.
- Serve them hot for breakfast, as a satisfying midday snack, or even a decadent dessert, confirming their versatile role in your daily indulgence rotation.
The Legend of the Luscious Red Roll
There is a specific kind of morning chaos that only exists when trying to perfect a new baking project before the neighbors wake up. I first attempted these crimson beauties on a morning that involved flour explosions and a brief, but passionate, disagreement with my standing mixer. I was aiming for classic cinnamon rolls, but felt they lacked pizzazz. Everything feels better in red, right?
Red velvet, historically, wasn’t just about food coloring; it was about the chemical reaction between acidic buttermilk and cocoa powder, which gave the cake a reddish-brown tint and a distinctive tang. That subtle acidity cuts through the sweetness, making the overall experience deeply satisfying without being cloying. Applying this logic to cinnamon rolls was my stroke of genius—or perhaps caffeine-fueled madness. These rolls required patience, especially when waiting for the dough to prove, but trust me, the results are worth the wait. They are undeniably soft, perfectly spiced, and truly demonstrate why they are calledIrresistible Red Velvet Cinnamon Rolls – Sweet and Soft Breakfast Recipe.
Mastering the Dough: The Key to Pillowy Softness
The texture of the dough determines the final result, and nobody wants a tough cinnamon roll. We need a dough that is elastic, tender, and willing to balloon into a majestic fluff ball. Start by ensuring your yeast is happy. If your yeast doesn’t bubble like a toddler discovering soda for the first time, your dough won’t rise. Warm milk, not hot, is essential—think comfortable bath temperature, not boiling magma. Too hot, and you’ve accidentally ended the yeast’s career.
Once you combine the dry and wet ingredients, knead the dough until it achieves the “windowpane test.” This is when you can stretch a small piece of dough thin enough to see light through it without tearing. This process builds gluten structure, which is the backbone of your pillowy creation. Incorporating a tiny bit of high-quality cocoa powder gives that subtle chocolate depth that complements the cinnamon spice beautifully, distinguishing this recipe from its plain, beige cousins.
The Art of the Crimson Swirl and Cream Cheese Frosting
The visual appeal of these rolls relies entirely on the vibrant red color, which should look celebratory rather than alarming. A good quality gel food color is far superior to liquid color, as it doesn’t thin out the dough. Add the color gradually during the mixing stage, aiming for a deep, rich crimson before the first rise. Then comes the filling: a generous slathering of softened butter mixed with brown sugar and plenty of ground cinnamon. Do not skimp on the filling; that melting cinnamon-sugar mixture is what caramelizes into the sticky, glorious bottom layer.
Rolling the dough evenly is crucial. Imagine you are rolling up a yoga mat, not wadding up laundry. A tight, even spiral ensures that the rolls hold their shape and bake consistently. Slice the rolls using unscented dental floss instead of a knife. Seriously, it’s the best hack for clean cuts without squishing your beautiful spirals. Once baked, the rolls emerge from the oven, filling your entire kitchen with an aroma that smells suspiciously like pure happiness. But what is happiness without the icing? We are topping these with a rich, tangy cream cheese frosting. Ensure the butter and cream cheese are perfectly softened to avoid lumps—a lumpy frosting is a tragedy we can easily avoid.
Ingredients for Irresistible Red Velvet Cinnamon Rolls – Sweet and Soft Breakfast Recipe
Here’s what you’ll need to make this delicious dish:
- All-Purpose FlourProvides the structure for the rolls; ensure you measure it using the scoop-and-level method for accuracy.
- Active Dry YeastThe leavening agent responsible for the amazing lift; check the expiration date to ensure freshness and potency.
- Whole Milk and ButtermilkWhole milk adds richness, while buttermilk provides the necessary acidity for the classic red velvet tang and contributes to a tender crumb.
- Unsalted ButterUsed both in the dough and the filling, providing richness and moisture; make sure it is softened for both purposes.
- Granulated Sugar and Brown SugarSweetens the dough and, when combined with cinnamon, creates the sticky, gooey filling that caramelizes beautifully.
- High-Quality Cocoa PowderA small amount adds depth and richness, enhancing the red velvet flavor profile without making the rolls taste overtly chocolatey.
- Ground CinnamonThe star spice of the filling; use fresh cinnamon for the most intense and aromatic results.
- Red Gel Food ColoringEssential for achieving the vibrant, deep red hue characteristic of red velvet pastries.
- Cream CheeseThe base for the frosting; use full-fat cream cheese for the best texture and tanginess.
- Powdered SugarUsed for the frosting, dissolving quickly to create a smooth, pipeable glaze.
The full ingredients list, including measurements, is provided in the recipe card directly below.
How to Make Irresistible Red Velvet Cinnamon Rolls – Sweet and Soft Breakfast Recipe
Follow these simple steps to prepare this delicious dish:
-
Activate the Yeast and Prepare the Dough
In a small bowl, combine warm milk (around 105°F/40°C), yeast, and a pinch of sugar. Let it sit for 5 to 10 minutes until foamy. In a large mixing bowl, combine the flour, remaining sugar, salt, and cocoa powder. Add the activated yeast mixture, melted butter, buttermilk, egg, and red food coloring. Mix and knead for 8 to 10 minutes until the dough is smooth and passes the windowpane test. Place the dough in a greased bowl, cover, and allow it to rise in a warm spot for 60–90 minutes until doubled in size.
-
Assemble the Cinnamon Filling
While the dough rises, prepare the filling by thoroughly creaming together the softened butter, brown sugar, and ground cinnamon until you achieve a thick, spreadable paste. Once the dough has doubled, punch it down gently and turn it out onto a lightly floured surface. Roll the dough into a large rectangle, approximately 18 x 12 inches (45 x 30 cm).
-
Roll, Slice, and Second Proof
Spread the prepared cinnamon filling evenly over the dough, ensuring you cover the entire surface right up to the edges. Starting from the long end, roll the dough tightly into a log. Using unscented dental floss or a very sharp knife, cut the log into 12 equal rolls, about 1.5 inches thick. Place the rolls into a lightly greased 9×13 inch baking dish, ensuring they are touching slightly. Cover the dish and let them rise for a second proof for 30–45 minutes until slightly puffy.
-
Bake the Rolls to Perfection
Preheat your oven to 375°F (190°C). Bake the rolls for 20 to 25 minutes, or until the edges are golden brown and the interior looks cooked through, but still very soft. If the tops begin to brown too quickly, loosely tent the dish with aluminum foil. Remove the rolls from the oven and let them cool in the pan for about 10 minutes while you prepare the frosting.
-
Whip Up the Cream Cheese Frosting
To make the frosting, beat the softened cream cheese and butter together until smooth and fluffy. Gradually add the powdered sugar and a splash of vanilla bean paste, beating until the frosting is light and spreadable. If the frosting seems too thick, add a teaspoon of milk until you reach the desired consistency.
-
Glaze and Serve
Slather the generous cream cheese frosting over the warm, but not piping hot, cinnamon rolls. Applying the frosting while they are still warm allows it to melt slightly into the cracks and crevices, ensuring maximum gooeyness.
Transfer to plates and drizzle with extra melted butter for the perfect finishing touch, or just grab one straight out of the pan and embrace the stickiness.
Troubleshooting and Pro Tips for Bakery-Worthy Rolls
Even the most seasoned baker can encounter a rogue roll or two. Baking is chemistry mixed with magic, and sometimes the chemicals stage a revolt. If your rolls came out tough, the likely culprits are either too much flour or over-kneading—remember, we want soft and fluffy, not biceps-building bread. If they didn’t rise, your yeast was probably dead or your milk was too hot. Always double-check your temperature!
The Overnight Preparation Hack
Want fresh, hot cinnamon rolls without waking up before dawn? Prepare the rolls up through Step 3 (rolling and cutting). Place them snugly in the baking dish, cover them tightly with plastic wrap, and refrigerate overnight. In the morning, pull them out and let them rest at room temperature for 60 to 90 minutes while the oven preheats. This slow, cold rise develops incredible flavor and texture, making your early morning routine significantly easier.
Adjusting the Filling for Flavor Depth
While cinnamon is the star, you can enhance the flavor profile. Try adding a pinch of freshly ground cardamom or a tiny bit of nutmeg to the filling mixture for warmth. For a slightly richer roll, melt clarified butter instead of softened butter and brush it over the dough before spreading the filling. This technique creates an extra layer of moisture and richness, truly solidifying the “Irresistible Red Velvet Cinnamon Rolls – Sweet and Soft Breakfast Recipe” title.
Frequently Asked Questions About Red Velvet Baking
Can I substitute the buttermilk?
While buttermilk is key to the texture and flavor, if you are in a pinch, you can make a substitute: measure one cup of whole milk and stir in one tablespoon of white vinegar or lemon juice. Let it sit for five minutes until it curds slightly. This acidic mixture mimics the role of buttermilk in tenderizing the dough.
How should I store leftover cinnamon rolls?
Store leftover rolls, fully frosted, in an airtight container at room temperature for up to two days. For longer storage, refrigerate them for up to five days. To reheat and restore their pillowy softness, microwave individual rolls for 10 to 15 seconds, or warm them in a 350°F (175°C) oven for about 5 minutes.
What kind of red coloring works best?
Always use high-quality gel food coloring, specifically Super Red or similar intense shades. Liquid food coloring contains too much water and can drastically affect the dough’s consistency and moisture level, resulting in paler rolls and a less predictable bake.
Why are my rolls dry on the inside?
Dry rolls usually mean two things: you added too much flour during the mixing or kneading process, or you overbaked them. Use a kitchen scale to measure the flour accurately, and always check the rolls near the 20-minute mark. They should still look slightly soft in the center when removed from the oven, as they continue to cook from residual heat.
The Sweetest Way to Start Your Day
TheseIrresistible Red Velvet Cinnamon Rolls – Sweet and Soft Breakfast Reciperolls are more than just a sweet treat; they are an experience. They demand attention, reward patience, and deliver an unparalleled combination of soft, buttery dough, spicy cinnamon swirl, and decadent cream cheese frosting. Don’t wait for a special occasion; make your own reason to indulge. Bake them, share them, or hide them all in a cupboard and eat them when nobody is looking. I promise, I won’t tell a soul.
Go forth and conquer that dough! Happy baking!
The Day I Learned Cinnamon Rolls Needed a Color Change
There is a sacred place in the breakfast hierarchy, and right at the top sits the cinnamon roll—pillowy soft, warmly spiced, and unapologetically decadent. But after years of perfecting the classic swirls, I realized something was missing. A jolt of drama. A velvet cape for my morning routine. That’s how the madness began: the quest to create theIrresistible Red Velvet Cinnamon Rolls – Sweet and Soft Breakfast Recipethat tasted exactly like the best cake you’ve ever had, wrapped snugly in buttery yeast dough.
Baking these rolls is not just about combining ingredients; it’s an adventure in indulgence. We are skipping the usual shortcuts, embracing the deep, rich flavor of cocoa married perfectly with a gentle tang of buttermilk and vinegar, all swirled up with that iconic cinnamon-sugar filling. If you thought regular cinnamon rolls were good, prepare for a breakfast experience that stops conversations and demands immediate seconds.
Forget dry, cardboard-like pastries. This recipe focuses on keeping the dough incredibly tender, achieving that cloud-like texture that melts in your mouth. The secret? Careful kneading, perfect proofing temperatures, and enough high-quality cocoa powder to give it that necessary red velvet richness without making it bitter. Let’s dive into the required components to craft this masterpiece.
Gathering the Essentials for Velvet Dough
Creating the signature red color requires both food coloring and the chemical reaction between cocoa, buttermilk, and vinegar. Do not skip the buttermilk—it contributes significantly to the final tenderness and slight tang essential for authentic red velvet flavor. Ensure your yeast is fresh; lethargic yeast results in dense, sad rolls, and nobody wants a sad roll for breakfast.
- For the Dough:
- 5 cups all-purpose flour (plus extra for dusting)
- 1 cup warm milk (around 105°F to 115°F)
- 1/2 cup granulated sugar
- 2 1/4 teaspoons active dry yeast (one standard packet)
- 1/2 teaspoon salt
- 2 large eggs, room temperature
- 1/4 cup unsalted butter, melted
- 1 tablespoon unsweetened cocoa powder
- 1 tablespoon vanilla bean paste
- 1/4 cup buttermilk
- 1 tablespoon white vinegar
- 1–2 ounces liquid red food coloring (high quality gel works best)
- For the Filling:
- 1 cup light brown sugar, packed
- 3 tablespoons ground cinnamon
- 1/2 cup (1 stick) unsalted butter, softened
- For the Cream Cheese Frosting:
- 8 ounces cream cheese, softened
- 1/2 cup unsalted butter, softened
- 3 cups powdered sugar, sifted
- 1 teaspoon vanilla bean paste
- 2 tablespoons milk or cream
Crafting the Ultimate Red Velvet Swirls
Patience is your key ingredient here. Yeast needs time and warmth to perform its magic. If you rush the proofing stages, your rolls will bake unevenly and lack that airy quality we are chasing. Use a stand mixer if you have one, but a good arm workout works perfectly too!
Step 1: Activating and Mixing the Dough
Combine warm milk, sugar, and yeast in a large bowl. Let it sit for about five to ten minutes until foamy—this confirms your yeast is alive and ready to party. In a separate bowl, whisk together the melted butter, eggs, vanilla, buttermilk, vinegar, and red food coloring. In your mixer bowl, combine flour, cocoa powder, and salt. Add the wet mixture and the yeast mixture to the dry ingredients. Mix on low speed until a shaggy dough forms, then knead for about five to seven minutes until the dough is smooth and elastic. It should be slightly tacky but not sticky.
Step 2: The First Rise (Proofing)
Place the dough in a lightly greased bowl, turning it once to coat. Cover the bowl tightly with plastic wrap or a clean kitchen towel. Place it in a warm, draft-free spot. Let the dough rise until it has doubled in size, usually between one and two hours, depending on your kitchen temperature. This is the moment to catch up on important kitchen dramas or maybe just unload the dishwasher.
Step 3: Rolling and Filling
Punch down the proofed dough gently and turn it out onto a lightly floured surface. Roll it into a large rectangle, approximately 12 by 18 inches. Ensure the thickness is uniform across the entire sheet. In a small bowl, combine the brown sugar and cinnamon for the filling. Spread the softened butter evenly across the dough rectangle, making sure to reach the edges. Sprinkle the cinnamon-sugar mixture over the butter, pressing it lightly into the surface.
Step 4: Shaping and The Second Rise
Starting with the long edge, tightly roll the dough into a cylinder. Use sharp, unflavored dental floss or a very sharp knife to cut the log into 12 equally sized rolls, about 1 1/2 inches thick each. Place the rolls into a lightly buttered 9×13 inch baking pan, leaving a small gap between them. Cover the pan loosely and let the rolls rise again in a warm spot for about 30 to 45 minutes. They should look puffy and nearly touching.
Step 5: Baking and Frosting
Preheat your oven to 375°F (190°C). Bake the rolls for 20 to 25 minutes, or until they are puffed up and cooked through. They won’t look golden brown because, well, they are red. While they are baking, prepare the frosting: Beat the cream cheese and butter until smooth. Gradually add the powdered sugar, then the vanilla and milk, beating until light and fluffy. Once the rolls are out of the oven, allow them to cool for just five minutes before slathering them generously with the rich cream cheese frosting. Serve immediately and watch them vanish.
I once decided to use slightly cooler milk for the yeast, thinking I was saving time. The resulting rolls were tiny, angry, and dense. Never underestimate the importance of temperature control when dealing with yeast—it demands respect.
Expert Tips for Perfect Red Velvet Rolls
- Achieve that vivid red hue by incorporating high-quality gel food coloring, adding it during the liquid stage with the buttermilk and vanilla.
- Use softened butter, not melted, for the filling; this prevents the cinnamon sugar from dissolving and ensures a distinct, gooey layer after baking.
- For clean slices, place the rolled dough log in the freezer for about 15 minutes before cutting; this firms up the butter and prevents squishing the perfect swirl.
Perfecting the Cooking Process

Start by activating the yeast while you measure dry ingredients, integrating the colored liquid components next for maximum efficiency. Ensure the dough completes the first proof fully before shaping and cutting the rolls, as this guarantees maximum rise and the final soft texture everyone desires.
Add Your Touch
Elevate these sweet treats by adding miniature dark chocolate chips to the filling mixture for an intense cocoa hit. Alternatively, swap out traditional vanilla bean paste in the frosting for alcohol-free almond extract to introduce a subtle, sophisticated nutty flavor profile. You could also sprinkle chopped pecans on top.
Storing & Reheating
Store uneaten rolls tightly covered in an airtight container at room temperature for up to two days, or refrigerate for up to five days. To reheat, microwave individual rolls for 15 to 20 seconds, or wrap the whole pan loosely in foil and bake at 350°F for 10 minutes to restore that wonderful soft center.
The Science Behind the Color and Flavor
Many people associate red velvet merely with food coloring, but the flavor is far more complex. The original recipe relies on the chemical reaction between acidic ingredients (like vinegar and buttermilk) and natural cocoa powder, which historically contained anthocyanin, a pigment that turns reddish when exposed to acid. While modern cocoa processing often removes this pigment, we add the artificial coloring to achieve that signature dramatic look, retaining the critical acidic components for the necessary flavor depth and dough tenderness. It’s chemistry you can happily eat.
Making theseIrresistible Red Velvet Cinnamon Rolls – Sweet and Soft Breakfast Recipetruly transforms a regular weekend into an event. They are perfect for holiday brunches or just celebrating Tuesday. The effort you put into the proofing stages pays dividends in flavor and texture, resulting in a pastry that is deeply satisfying and unbelievably tender.
Frequently Asked Questions About Baking These Rolls
How do I prevent the rolls from drying out while baking?
The key is monitoring the internal temperature; the rolls are done when they register around 200°F (93°C). If the edges look dark but the centers are not cooked, cover the pan loosely with foil for the last five to ten minutes of baking time.
Can I prepare the dough overnight?
Absolutely. Complete steps 1 through 3 (rolling and filling). Place the uncut log in a pan, cover tightly, and refrigerate overnight. In the morning, let the log warm up slightly, cut into rolls, and proceed with the second rise (step 4), which may take slightly longer because the dough is cold.
What if my dough isn’t rising properly?
Dough failure is usually related to yeast health or temperature. Ensure your milk is warm but not hot (hot liquid kills the yeast). If your kitchen is cold, try placing the covered bowl inside a cold oven with only the light turned on; the warmth from the light bulb often provides the perfect, consistent temperature for proofing.
Is there a substitute for buttermilk?
Yes, if you are out of buttermilk, you can make a quick substitute. Combine 1 cup of regular milk with 1 tablespoon of white vinegar or lemon juice. Stir it and let it stand for five minutes until it curdles slightly. This DIY buttermilk provides the necessary acid to interact with the cocoa and tenderize the dough.
Can I freeze these cinnamon rolls?
Yes, you can freeze them either baked or unbaked. For unbaked rolls, cut them, place them in the pan, cover tightly, and freeze. Thaw overnight in the refrigerator, then let them come to room temperature and perform the second rise before baking. Baked rolls freeze well too; just omit the frosting until serving.
Enjoying these fluffy rolls, which combine the warmth of cinnamon with the luxury of red velvet cake, guarantees a truly special morning meal. Remember that baking is a forgiving art, and even if your swirls aren’t perfect, the flavor of these deeply colored, soft breakfast pastries will always be spectacular.
Conclusion for Irresistible Red Velvet Cinnamon Rolls – Sweet and Soft Breakfast Recipe
We’ve conquered the kitchen, navigated the mysteries of yeast, and emerged victorious with a batch of pure confectionery magic. These Irresistible Red Velvet Cinnamon Rolls – Sweet and Soft Breakfast Recipe truly deliver on their promise, combining the decadent cocoa notes of red velvet cake with the comforting, fluffy embrace of a classic roll. Whether you’re serving them for a holiday brunch or simply elevating a regular Tuesday morning, the incredible aroma and the luxurious, melt-in-your-mouth cream cheese frosting make the effort completely worthwhile. Go ahead, treat yourself and everyone around you—you deserve this moment of sweet, velvety bliss.
FAQs
How do I achieve that deep red color and flavor in my rolls?
Achieving the iconic red velvet color requires a high-quality, concentrated red food gel, not liquid dye, which can drastically thin your dough. The classic flavor profile relies on a delicate balance of cocoa powder (just enough for depth, not overwhelming chocolate flavor) and a touch of distilled white vinegar or lemon juice. This combination interacts beautifully with the buttermilk, ensuring your finished roll has that signature tangy sweetness, making these truly irresistible Red Velvet Cinnamon Rolls – Sweet and Soft Breakfast Recipe. This attention to detail guarantees a visually stunning and delicious outcome.
Why isn’t my dough rising properly, leading to dense rolls?
Dough density is usually a yeast issue, often stemming from temperature. Ensure your water or milk is lukewarm—around 105°F to 115°F. If the liquid is too hot, it kills the yeast, and if it’s too cold, it fails to activate it. Also, always check the expiration date on your yeast packet! If, after proofing, the dough still feels overly tight or dry, it won’t stretch and expand well, resulting in heavy rolls instead of the sweet and soft texture we crave. Adding a tiny amount of extra liquid can sometimes rescue a reluctant dough.
Can I prepare these amazing cinnamon rolls the night before baking?
Absolutely! Preparing these amazing cinnamon rolls ahead of time is the secret to a stress-free morning, whether for brunch or a weekend treat. After shaping and cutting the rolls, place them snugly in the baking pan, cover them tightly with plastic wrap, and refrigerate overnight for up to 12 hours. When you wake up, take the rolls out and let them proof at room temperature for about 60 to 90 minutes while your oven preheats. This slow, cold proof enhances the flavor and yields an incredibly fluffy, rich breakfast treat that tastes perfectly fresh.
What is the secret to making a perfect tangy cream cheese frosting for Irresistible Red Velvet Cinnamon Rolls?
The perfect cream cheese frosting starts with proper ingredient temperature. Ensure both your cream cheese and butter are completely softened to room temperature; this is crucial for preventing a lumpy or grainy icing texture. For that essential tang that perfectly complements the rich flavor of the rolls, use a small dash of fresh lemon juice alongside your vanilla bean paste. Furthermore, always sift your powdered sugar, as this eliminates any remaining clumps. Whip the frosting on high speed for several minutes until it achieves a light, cloud-like consistency ready to drizzle over your warm, sweet and soft breakfast recipe.


Leave a Comment