

Christmas Peppermint Creams: A Festive Delight
Christmas Peppermint Creams are a delightful treat that perfectly encapsulates the spirit of the holiday season. With their vibrant colors and refreshing minty flavor, these creamy confections are not just a feast for the taste buds but also a visual delight that brings joy to any festive gathering. Originating from traditional British sweets, peppermint creams have been enjoyed for generations, often served as a sweet ending to holiday meals or as a charming gift during the festive season.
What makes Christmas Peppermint Creams so beloved is their irresistible combination of taste and texture. The smooth, creamy center contrasts beautifully with the crisp outer layer, creating a satisfying bite that leaves you wanting more. Plus, they are incredibly easy to make, allowing you to whip up a batch in no time, making them a convenient addition to your holiday festivities. Whether you’re sharing them with family or gifting them to friends, these treats are sure to spread holiday cheer and create lasting memories.

Ingredients:
- 200g dark chocolate (at least 70% cocoa)
- 200g white chocolate
- 250g icing sugar
- 100g unsalted butter, softened
- 1 tsp peppermint extract
- 1/4 tsp salt
- Red food coloring (optional)
- Candy canes, crushed (for decoration)
Preparing the Peppermint Cream Filling
- In a large mixing bowl, combine the softened unsalted butter and icing sugar. Using an electric mixer, beat them together on medium speed until the mixture is smooth and creamy. This should take about 2-3 minutes.
- Add the peppermint extract and salt to the mixture. Continue to mix until fully incorporated. The peppermint extract will give your creams that delightful minty flavor.
- If you want to add a festive touch, you can incorporate a few drops of red food coloring into the mixture. Use a spatula to gently fold the color in until you achieve a light pink hue. Be careful not to overmix, as you want to maintain a marbled effect.
- Once the filling is well mixed, cover the bowl with plastic wrap and refrigerate for about 30 minutes. This will help the mixture firm up, making it easier to shape into rounds.
Shaping the Peppermint Creams
- After the filling has chilled, remove it from the refrigerator. Using a small cookie scoop or your hands, take a small amount of the mixture (about 1 teaspoon) and roll it into a ball. Place the balls on a baking sheet lined with parchment paper.
- Continue this process until all the filling is shaped into balls. You should have around 30-35 peppermint creams, depending on the size you choose.
- Once all the balls are shaped, place the baking sheet back in the refrigerator for another 30 minutes to firm up further. This step is crucial for ensuring that the creams hold their shape when dipped in chocolate.
Melting the Chocolate
- While the peppermint creams are chilling, it’s time to prepare the chocolate coating. Start by breaking the dark chocolate into small pieces and placing them in a heatproof bowl.
- Set up a double boiler by filling a saucepan with a couple of inches of water and bringing it to a simmer. Place the bowl of chocolate over the saucepan, ensuring that the bottom of the bowl doesn’t touch the water.
- Stir the chocolate gently as it melts. Once it’s completely melted and smooth, remove it from the heat and let it cool slightly. This will help prevent the chocolate from seizing when you dip the creams.
- If you prefer a white chocolate coating for a different flavor, repeat the melting process with the white chocolate in a separate bowl.
Dipping the Peppermint Creams
- Once the peppermint creams are firm and the chocolate is melted, it’s time to dip! Using a fork or a dipping tool, take one peppermint cream and dip it into the melted dark chocolate. Make sure it’s fully coated.
- Allow any excess chocolate to drip off before placing the dipped cream back onto the parchment-lined baking sheet. If you’re using white chocolate, follow the same process.
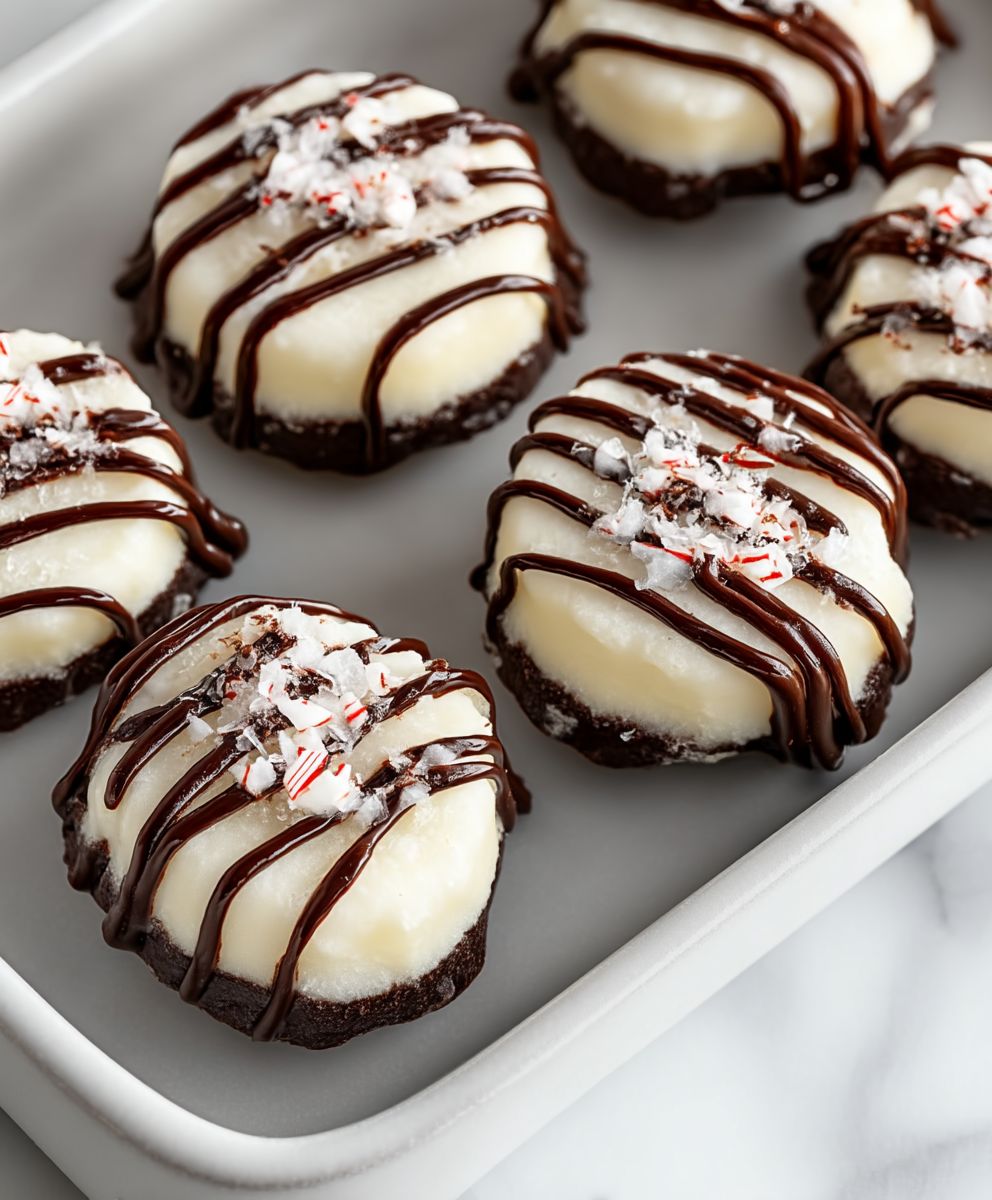
- While the chocolate is still wet, sprinkle some crushed candy canes on top of each cream for a festive touch. This adds a nice crunch and enhances the peppermint flavor.
- Repeat the dipping process for all the peppermint creams, alternating between dark and white chocolate if desired.
Setting the Chocolate
- Once all the peppermint creams are dipped and decorated, place the baking sheet in the refrigerator for about 30 minutes. This will allow the chocolate to set completely.
- After the chocolate has hardened, you can transfer the peppermint creams to an airtight container. They can be stored in the refrigerator for up to two weeks, but I doubt they’ll last that long!
Serving Suggestions
- These Christmas peppermint creams make a delightful treat for holiday gatherings. You can serve them on a festive platter or package them in decorative boxes as gifts for
Conclusion:
In conclusion, this Christmas Peppermint Creams recipe is a delightful treat that captures the essence of the holiday season. The combination of rich, creamy filling and refreshing peppermint flavor creates a perfect balance that is sure to impress your family and friends. Not only are these sweets a feast for the taste buds, but they also make for a beautiful presentation, adding a festive touch to any holiday gathering.
One of the best aspects of this recipe is its versatility. You can serve these peppermint creams as a standalone dessert, or you can use them as a charming addition to your holiday dessert platter. They pair wonderfully with a cup of hot cocoa or a warm mug of spiced cider, making them an ideal treat for cozy winter evenings. If you want to get creative, consider dipping them in dark or white chocolate for an extra layer of indulgence. You could also experiment with different flavorings, such as orange or almond extract, to give your peppermint creams a unique twist.
I encourage you to try making these Christmas Peppermint Creams yourself. The process is simple and enjoyable, and the end result is incredibly rewarding. Whether you’re making them for a holiday party, as gifts for loved ones, or just to enjoy at home, I promise they will be a hit. Plus, there’s something truly special about creating homemade treats that bring joy to others during the festive season.
Once you’ve made your peppermint creams, I would love to hear about your experience! Feel free to share your thoughts, any variations you tried, or even photos of your creations. You can connect with me on social media or leave a comment below. Your feedback not only inspires me but also helps others discover the joy of making these delicious Christmas Peppermint Creams.
So, gather your ingredients, roll up your sleeves, and get ready to whip up a batch of these delightful treats. I can’t wait for you to experience the joy and satisfaction that comes from making and sharing your very own Christmas Peppermint Creams. Happy baking!
Christmas Peppermint Creams: A Festive Treat Recipe
A delicious and easy-to-make dish that combines fresh ingredients and bold flavors, perfect for any occasion. Enjoy a satisfying meal that is both nutritious and delightful!
Ingredients
Instructions
- In einer großen Schüssel Mehl, Salz und Hefe vermengen.
- Wasser hinzufügen und zu einem Teig verrühren.
- Knoblauch und Olivenöl unterrühren.
- Teig 12 Stunden gehen lassen.
Notes
- Der Teig darf während der Ruhezeit nicht bewegt werden.
- Für ein intensiveres Knoblaucharoma können mehr Zehen verwendet werden.


Leave a Comment