
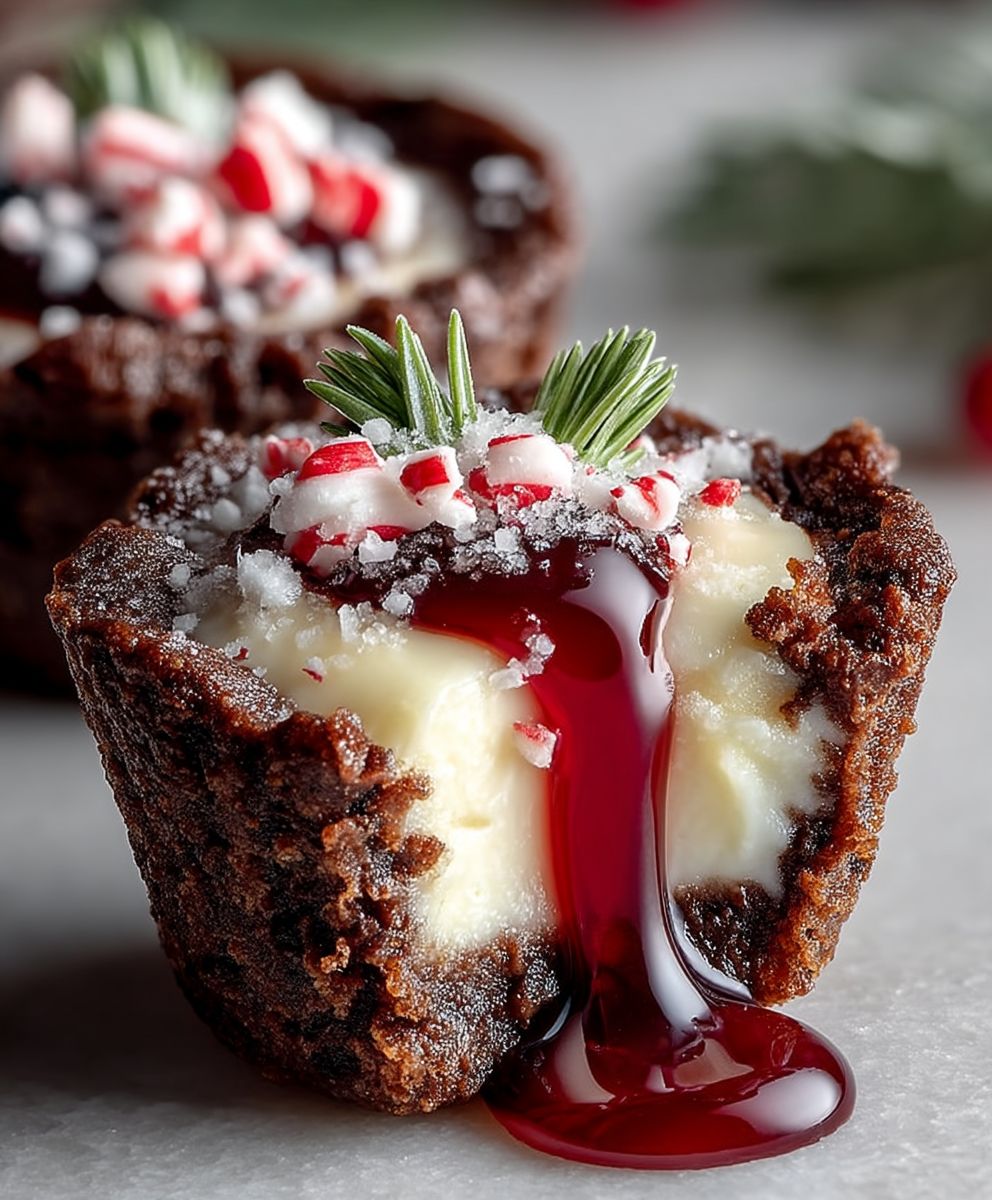
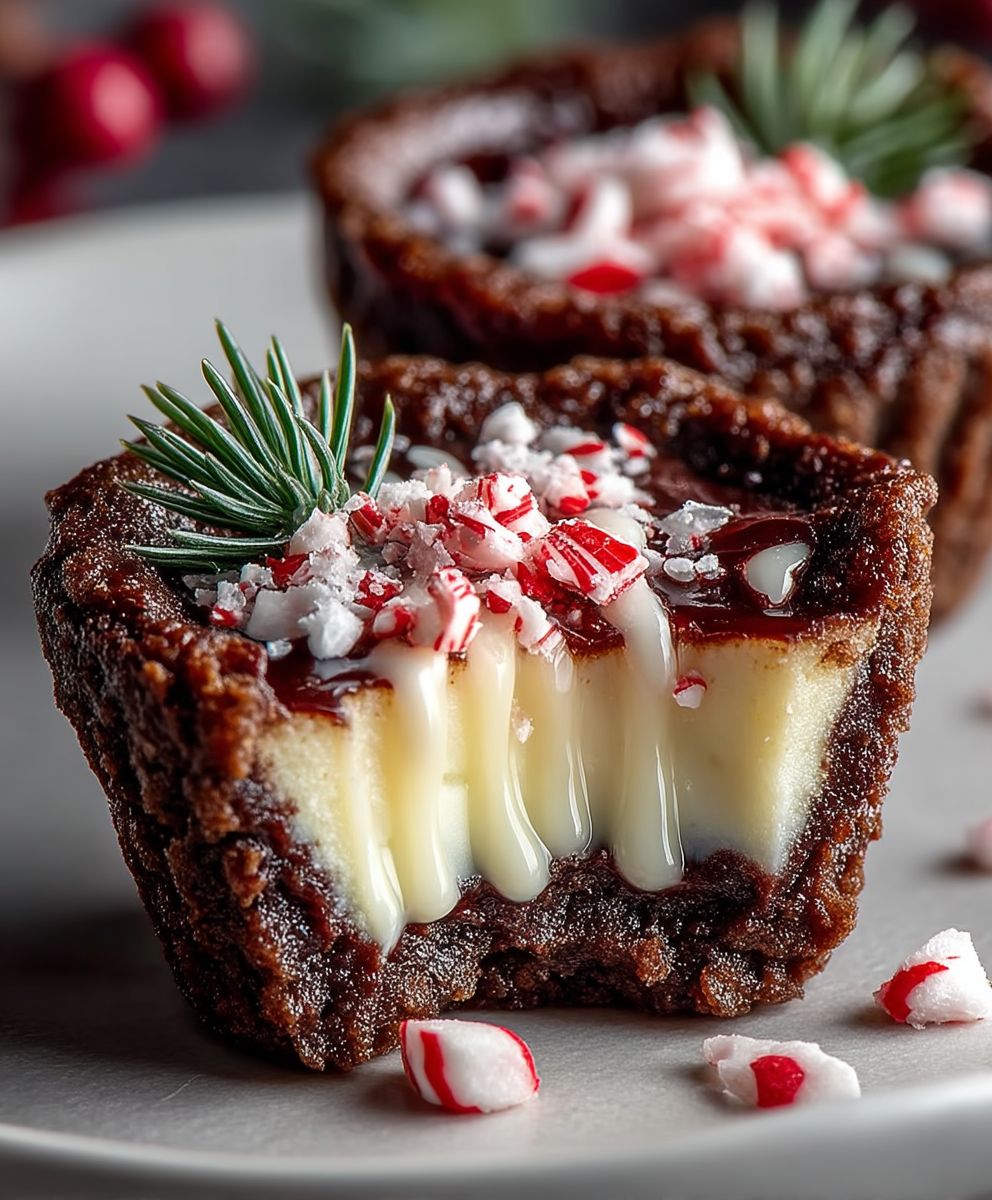
Chocolate Peppermint Cookie Cups: A Festive Delight
Chocolate Peppermint Cookie Cups are the perfect treat to bring a touch of holiday magic to your dessert table. Imagine biting into a soft, chocolatey cookie that cradles a creamy peppermint filling, topped with a sprinkle of festive crushed candy canes. This delightful combination not only satisfies your sweet tooth but also evokes the warmth and joy of the holiday season.
The origins of chocolate and peppermint as a pairing date back centuries, with both ingredients being celebrated for their rich flavors and aromatic qualities. Over time, this duo has become a staple in holiday baking, symbolizing comfort and cheer. People love these cookie cups not just for their irresistible taste and texture, but also for their convenience; they are easy to make and perfect for sharing with family and friends.
Join me as we dive into this delightful recipe for Chocolate Peppermint Cookie Cups, and let’s create a sweet memory together that will surely become a holiday tradition!

Ingredients:
- 1 cup unsalted butter, softened
- 1 cup granulated sugar
- 1 cup brown sugar, packed
- 2 large eggs
- 2 teaspoons vanilla extract
- 3 cups all-purpose flour
- 1 cup unsweetened cocoa powder
- 1 teaspoon baking soda
- 1/2 teaspoon salt
- 1 cup chocolate chips (semi-sweet or dark)
- 1/2 cup crushed peppermint candies or candy canes
- 1 cup white chocolate chips (for filling)
- 1/4 teaspoon peppermint extract (optional, for extra flavor)
Preparing the Dough
- In a large mixing bowl, cream together the softened butter, granulated sugar, and brown sugar until the mixture is light and fluffy. This should take about 3-5 minutes using an electric mixer on medium speed.
- Add the eggs, one at a time, mixing well after each addition. Then, stir in the vanilla extract until fully incorporated.
- In a separate bowl, whisk together the all-purpose flour, cocoa powder, baking soda, and salt. Gradually add this dry mixture to the wet ingredients, mixing on low speed until just combined. Be careful not to overmix.
- Fold in the chocolate chips and crushed peppermint candies using a spatula, ensuring they are evenly distributed throughout the dough.
Chilling the Dough
- Once the dough is prepared, cover the bowl with plastic wrap or a clean kitchen towel. Place it in the refrigerator to chill for at least 30 minutes. Chilling the dough helps to firm it up, making it easier to handle and preventing the cookies from spreading too much while baking.
Preparing the Cookie Cups
- Preheat your oven to 350°F (175°C) and grease a muffin tin with non-stick cooking spray or line it with muffin liners.
- After the dough has chilled, remove it from the refrigerator. Using a cookie scoop or your hands, take about 1.5 tablespoons of dough and roll it into a ball.
- Place each dough ball into the prepared muffin tin, pressing it down gently to form a cup shape. Make sure to leave some space at the top for the filling.
- Repeat this process until all the dough is used, filling each muffin cup about halfway.
Baking the Cookie Cups
- Place the muffin tin in the preheated oven and bake for 10-12 minutes, or until the edges are set but the centers are still soft. The cookie cups will continue to cook slightly after being removed from the oven.
- Once baked, remove the muffin tin from the oven and let it cool for about 5 minutes. Then, using the back of a small measuring spoon or your fingers, gently press down the centers of each cookie cup to create a well for the filling.
Filling the Cookie Cups
- While the cookie cups are cooling, melt the white chocolate chips. You can do this in a microwave-safe bowl in the microwave, heating in 30-second intervals and stirring in between until smooth. Alternatively, you can use a double boiler on the stovetop.
- If you want to enhance the peppermint flavor, stir in the peppermint extract into the melted white chocolate.
- Once the cookie cups have cooled slightly and the centers have been pressed down, carefully spoon the melted white chocolate into each cup, filling them to the top.
- For an extra festive touch, sprinkle additional crushed peppermint candies on top of the white chocolate filling while it is still warm, allowing them to stick.
Cooling and Serving
- Allow the filled cookie cups to cool completely at room temperature. This will help the white chocolate set properly.
- Once cooled, you can carefully remove the cookie cups from the muffin tin. If they stick, gently run a butter knife around the edges to loosen them.
- Transfer the cookie cups to a serving platter or an airtight container for
Conclusion:
If you’re looking for a delightful treat that perfectly balances the rich flavor of chocolate with the refreshing zing of peppermint, then these Chocolate Peppermint Cookie Cups are an absolute must-try! Not only are they visually stunning, but they also deliver a burst of flavor in every bite, making them an ideal dessert for any occasion, from holiday gatherings to cozy family nights. The combination of a soft, chewy cookie base with a creamy peppermint filling is simply irresistible, and I can guarantee that they will quickly become a favorite in your household.
When it comes to serving suggestions, these cookie cups are incredibly versatile. You can serve them warm, straight out of the oven, for a gooey, melty experience, or allow them to cool completely for a firmer texture. They pair wonderfully with a scoop of vanilla ice cream or a dollop of whipped cream on top, adding an extra layer of indulgence. For a festive touch, consider garnishing them with crushed candy canes or a drizzle of chocolate sauce. If you’re feeling adventurous, you can even experiment with different fillings—try swapping out the peppermint for other flavors like raspberry or orange for a unique twist!
I encourage you to gather your ingredients and give these Chocolate Peppermint Cookie Cups a try. They are not only fun to make but also a joy to share with friends and family. Once you’ve baked a batch, I would love to hear about your experience! Did you stick to the classic recipe, or did you try out any of the variations? Sharing your thoughts and any creative twists you added can inspire others to dive into this delicious recipe as well.
So, roll up your sleeves, preheat that oven, and let the sweet aroma of chocolate and peppermint fill your kitchen. I promise you won’t regret it! Whether you’re making them for a special occasion or just to satisfy your sweet tooth, these cookie cups are sure to impress. Don’t forget to snap a few photos of your creations and share them with your friends and on social media. Happy baking!
Chocolate Peppermint Cookie Cups: A Festive Holiday Treat
Indulge in these delightful Peppermint Chocolate Cookie Cups, featuring a rich chocolate cookie base filled with creamy white chocolate and topped with crushed peppermint candies. Perfect for the holiday season!
Ingredients
- 1 cup unsalted butter, softened
- 1 cup granulated sugar
- 1 cup brown sugar, packed
- 2 large eggs
- 2 teaspoons vanilla extract
- 3 cups all-purpose flour
- 1 cup unsweetened cocoa powder
- 1 teaspoon baking soda
- 1/2 teaspoon salt
- 1 cup chocolate chips (semi-sweet or dark)
- 1/2 cup crushed peppermint candies or candy canes
- 1 cup white chocolate chips (for filling)
- 1/4 teaspoon peppermint extract (optional, for extra flavor)
Instructions
- In a large mixing bowl, cream together the softened butter, granulated sugar, and brown sugar until the mixture is light and fluffy. This should take about 3-5 minutes using an electric mixer on medium speed.
- Add the eggs, one at a time, mixing well after each addition. Then, stir in the vanilla extract until fully incorporated.
- In a separate bowl, whisk together the all-purpose flour, cocoa powder, baking soda, and salt. Gradually add this dry mixture to the wet ingredients, mixing on low speed until just combined. Be careful not to overmix.
- Fold in the chocolate chips and crushed peppermint candies using a spatula, ensuring they are evenly distributed throughout the dough.
- Once the dough is prepared, cover the bowl with plastic wrap or a clean kitchen towel. Place it in the refrigerator to chill for at least 30 minutes.
- Preheat your oven to 350°F (175°C) and grease a muffin tin with non-stick cooking spray or line it with muffin liners.
- After the dough has chilled, remove it from the refrigerator. Using a cookie scoop or your hands, take about 1.5 tablespoons of dough and roll it into a ball.
- Place each dough ball into the prepared muffin tin, pressing it down gently to form a cup shape. Make sure to leave some space at the top for the filling.
- Repeat this process until all the dough is used, filling each muffin cup about halfway.
- Place the muffin tin in the preheated oven and bake for 10-12 minutes, or until the edges are set but the centers are still soft.
- Once baked, remove the muffin tin from the oven and let it cool for about 5 minutes. Then, using the back of a small measuring spoon or your fingers, gently press down the centers of each cookie cup to create a well for the filling.
- While the cookie cups are cooling, melt the white chocolate chips in a microwave-safe bowl or using a double boiler.
- If desired, stir in the peppermint extract into the melted white chocolate.
- Once the cookie cups have cooled slightly and the centers have been pressed down, carefully spoon the melted white chocolate into each cup, filling them to the top.
- For an extra festive touch, sprinkle additional crushed peppermint candies on top of the white chocolate filling while it is still warm.
- Allow the filled cookie cups to cool completely at room temperature.
Notes
- For a more intense peppermint flavor, feel free to increase the amount of crushed peppermint candies or add more peppermint extract.
- These cookie cups can be stored in an airtight container at room temperature for up to 5 days.
- For a fun variation, try using different types of chocolate chips or adding nuts to the dough.


Leave a Comment