
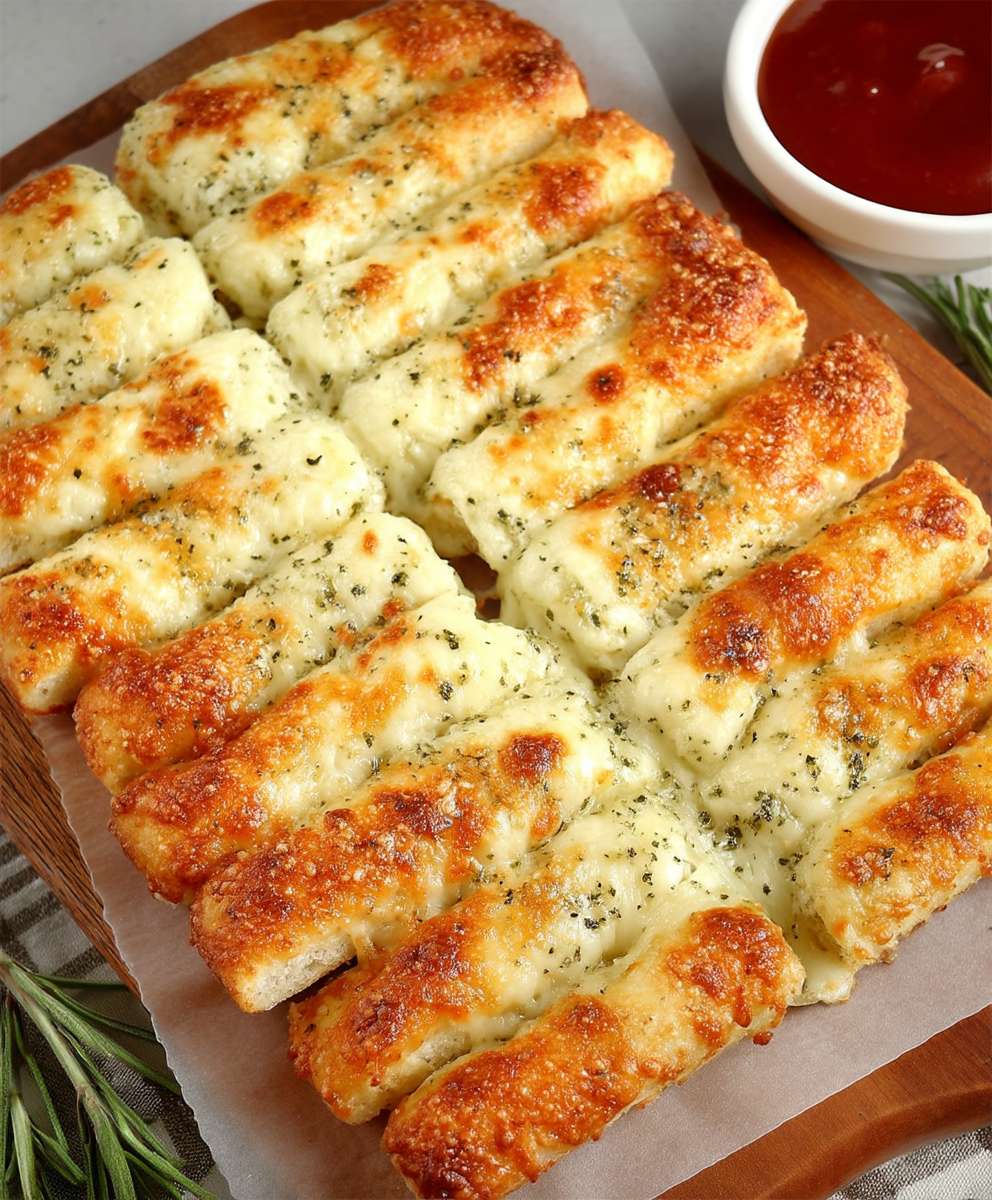
My kitchen often smells like a flavor explosion, but nothing quite compares to the moment golden, bubbly Cheesy Breadsticks Everyone Loves emerge from the oven. That aroma alone could launch a thousand cravings. I remember one game night where these saved the day, transforming hangry grumbles into joyous, cheesy smiles. Get ready for an instant crowd-pleaser. This recipe is surprisingly simple, allowing even novice bakers to achieve bakery-quality, comforting cheesy breadsticks with minimal fuss and maximum satisfaction. Expect a symphony of savory garlic and herbs mingling with gooey, melted cheese atop a perfectly crisp-chewy crust, creating an irresistible flavor profile. Visually, these golden-brown beauties, sprinkled with vibrant herbs and bubbling cheese, are an absolute showstopper, guaranteed to impress at any gathering. From a quick after-school snack to an elegant appetizer, these versatile cheesy delights effortlessly adapt to any occasion, making them a true culinary MVP.
Ingredients for Cheesy Breadsticks Everyone Loves
Here’s what you’ll need to make this delicious dish:
- All-Purpose FlourThe foundation of our dough, providing structure. Use a good quality brand for the best texture.
- Active Dry YeastEssential for that lovely rise and airy texture. Ensure your yeast is fresh and active for optimal results.
- Warm WaterActivates the yeast and helps create a pliable dough. It should be around 105-115°F (40-46°C), not too hot or too cold.
- Granulated SugarFeeds the yeast, kickstarting the fermentation process and adding a touch of sweetness to balance the savory flavors.
- SaltEnhances all the flavors in the bread and controls yeast activity. Don’t skip it, even if you’re trying to reduce sodium.
- Olive OilAdds richness to the dough, prevents sticking, and gives a beautiful golden crust. Extra virgin olive oil offers the best flavor.
- Mozzarella CheeseThe star of our cheesy masterpiece, known for its incredible melt and stretch. Shred your own for superior texture.
- Cheddar CheeseAdds a sharper, more complex flavor dimension to the breadsticks. A medium or sharp cheddar works wonderfully.
- Garlic PowderInfuses the breadsticks with a pungent, aromatic flavor. Use a good quality, finely ground powder for even distribution.
- Dried Italian SeasoningA blend of classic herbs like oregano, basil, and thyme, providing a traditional savory profile.
- Unsalted ButterBrushed on top for extra richness and a golden sheen. Melt it gently before use.
- Fresh ParsleyOptional, but a sprinkle of finely chopped fresh parsley adds a burst of color and fresh herbaceousness as a garnish.
The full ingredients list, including measurements, is provided in the recipe card directly below.
How to Make Cheesy Breadsticks Everyone Loves
Follow these simple steps to prepare this delicious dish: Step 1: Activate the Yeast In a large mixing bowl, combine the warm water and granulated sugar. Sprinkle the active dry yeast over the mixture. Let it sit for 5-10 minutes until a foamy layer forms on the surface, indicating the yeast is active and ready to work its magic. This bubbling action is crucial for a light and airy dough. Step 2: Prepare the Dough Add the olive oil, salt, and half of the all-purpose flour to the yeast mixture. Mix with a spoon until just combined. Gradually add the remaining flour, about half a cup at a time, mixing until a shaggy dough forms. Once the dough is too stiff to stir, turn it out onto a lightly floured surface. Step 3: Knead and Rise Knead the dough for 7-10 minutes until it becomes smooth, elastic, and no longer sticky. Form it into a ball, place it in a lightly oiled bowl, and turn it once to coat. Cover the bowl with a clean kitchen towel or plastic wrap and let it rise in a warm place for 60-90 minutes, or until it has doubled in size. Step 4: Assemble the Breadsticks Preheat your oven to 425°F (220°C). Lightly grease a large baking sheet. Gently punch down the risen dough and roll it out into a large rectangle, approximately 15×10 inches, directly on the prepared baking sheet or on parchment paper. In a small bowl, combine the shredded mozzarella and cheddar cheeses, garlic powder, and Italian seasoning. Brush the melted butter generously over the dough, then sprinkle the cheese mixture evenly over the entire surface. Step 5: Bake to Golden Perfection Bake for 12-18 minutes, or until the crust is golden brown and the cheese is bubbly and melted with slightly browned edges. Keep a close eye on it during the final minutes to prevent over-browning. Once out of the oven, immediately sprinkle with fresh parsley, if using, for a pop of color and flavor. Transfer to plates and drizzle with sauce for the perfect finishing touch.
The Irresistible Allure of Cheesy Breadsticks
There’s something uniquely comforting about golden, gooey, Cheesy Breadsticks Everyone Loves. They are the culinary equivalent of a warm hug on a cold day, a high-five from your best friend, and the celebratory confetti at a party, all rolled into one delightful package. These aren’t just snacks; they’re experience enhancers, mood lifters, and genuine crowd-pleasers. Imagine a scenario: a sudden gathering, a movie night, or simply an evening when cooking feels like too much of a chore. What’s the ultimate go-to that requires minimal fuss but delivers maximum satisfaction? You guessed it! The aroma alone, as it wafts through your home, promises deliciousness and signals good times ahead. The magic truly begins with the humble dough, transformed through the simple act of kneading and rising. It’s a meditative process, watching the yeast work its silent wonders, turning basic ingredients into something incredibly versatile and soft. Then comes the layer of savory garlic and herbs, a secret handshake between Italian-inspired flavors and pure comfort. And finally, the glorious avalanche of two distinct cheeses, melting into a golden, bubbling blanket of perfection. This recipe doesn’t just make food; it crafts memories, one glorious, cheesy pull-apart bite at a time. It’s the kind of dish that disappears from the table faster than you can say “more please!”
A Tale of Dough, Delight, and Dinnertime Disasters Averted
My love affair with homemade cheesy breadsticks began years ago, born out of necessity, as most great culinary innovations are. It was a typical Tuesday evening, mid-week slump in full swing. My partner was due home, promising a quiet night in, but then a text came through: “Bringing the gang over, impromptu game night!” Panic set in. My fridge was a wasteland, and my energy levels were dipping. What could I whip up quickly that would satisfy multiple hungry adults without a trip to the store? That’s when inspiration struck, a beacon of cheesy light in my moment of despair. I had flour, yeast, some leftover mozzarella, and a tiny block of cheddar. The mission: create something spectacular from next to nothing. With a flurry of mixing and a touch of frantic kneading, the dough came together. As it rose, I felt a sense of quiet accomplishment, like a tiny chef-superhero saving the day. The moment those golden breadsticks emerged from the oven, bubbling and fragrant, a collective gasp (and then a cheer) erupted from the arriving crowd. The game night went from potential disaster to legendary status, all thanks to these savory breadsticks. They were devoured within minutes, sticky fingers and satisfied smiles abound. From that day on, my “emergency cheesy breadsticks” became a regular, much-requested item, proving that sometimes, the simplest recipes yield the greatest joy and solve the biggest predicaments.
Perfecting Your Pull-Apart Masterpiece
Creating the best Cheesy Breadsticks Everyone Loves isn’t just about following steps; it’s about understanding the nuances that elevate a good recipe to an unforgettable one. From the temperature of your water to the type of cheese you choose, every detail plays a role in achieving that perfect chew, that delightful crisp, and that irresistible cheese pull. Don’t be afraid to experiment a little, but always start with a solid foundation. The beauty of this recipe lies in its forgiving nature, allowing room for personal touches while still guaranteeing a delicious outcome. Consider your oven’s personality—some run hotter, some cooler—and adjust baking times accordingly.
Dough-Lightful Tips and Tricks
The secret to truly spectacular savory breadsticks lies heavily in the dough. First, ensure your warm water for yeast activation is just right, like a warm bath, not too hot to kill the yeast and not too cool to hinder its activity. If you’re unsure, an instant-read thermometer is your best friend. Secondly, don’t skimp on the kneading time. This develops the gluten, which gives your breadsticks their characteristic chewiness and elasticity. A properly kneaded dough will be smooth and spring back when gently poked. If you have a stand mixer with a dough hook, now is its time to shine; otherwise, a good arm workout awaits. Finally, a warm, draft-free spot is ideal for rising. If your kitchen is chilly, try placing the bowl in a slightly warm (but turned off) oven or near a sunny window.
Cheese Choices: A Melty Marathon
While mozzarella and cheddar are a classic, winning combination for Cheesy Breadsticks Everyone Loves, feel free to explore other cheesy horizons. Provolone adds a sharper, more complex flavor, while a touch of Monterey Jack can increase the melt factor even further. For those who enjoy a bit of a kick, a sprinkle of pepper jack could add an exciting zing. The key is to use freshly shredded cheese. Pre-shredded cheeses often contain anti-caking agents that can hinder their melt and make your breadsticks less gooey. A cheese grater might seem like extra work, but the payoff in superior texture and flavor is absolutely worth it. Combine different cheeses for a unique flavor profile that truly makes these breadsticks your own.
Creative Twists: Beyond the Classic Cheesy Breadsticks
While the classic version of Cheesy Breadsticks Everyone Loves is a masterpiece in itself, there’s always room for a little culinary creativity. Think of the basic recipe as a canvas, and your imagination as the paintbrush. These subtle additions and variations can transform your breadsticks into something entirely new, catering to different tastes and occasions. From infusing different herbs to adding a kick of spice or even creating a sweet and savory fusion, the possibilities are endless. Don’t be afraid to step outside the box and make these truly your own signature snack.
Herbaceous Adventures
Elevate your savory breadsticks with an array of fresh or dried herbs. Beyond Italian seasoning, consider a sprinkle of dried oregano, basil, or thyme directly into the cheese mixture for a more intense flavor. For a fresher, brighter note, finely chop fresh rosemary or chives and sprinkle them over the dough before the cheese. A light dusting of fresh dill could introduce an unexpected, delightful twist. You can also mix a teaspoon of onion powder with the garlic powder for a deeper, more rounded savory taste. For a hint of warmth, a pinch of red pepper flakes can provide a gentle heat that complements the cheese beautifully.
Dipping Delights
No batch of Cheesy Breadsticks Everyone Loves is complete without the perfect dipping companion. Marinara sauce is the obvious classic, but why stop there? A creamy ranch dressing offers a cool, tangy contrast. For a garlicky punch, whip up a simple garlic aioli or a quick olive oil and balsamic vinegar dip. A robust pesto provides a vibrant, herbaceous alternative. You could even create a spicy tomato dip by adding a dash of hot sauce or chili powder to your marinara. Don’t underestimate the power of a good dip to enhance the overall experience and add another layer of flavor.
Storing Your Stash of Savory Goodness
Let’s be honest, often there aren’t any leftovers when you make Cheesy Breadsticks Everyone Loves. But on the rare occasion that you find yourself with a few extra pieces of this golden goodness, proper storage is key to maintaining their deliciousness. You want to preserve that perfect balance of chewiness and crispness, and most importantly, that wonderful cheesy flavor. With a little care, you can enjoy these savory breadsticks for days, making them a fantastic make-ahead option for busy weeks or unexpected cravings.
Reheating for Revival
To bring your leftover cheesy breadsticks back to their former glory, reheating them properly is crucial. Avoid the microwave, as it tends to make bread products soft and rubbery. The best method is to reheat them in an oven or toaster oven at 350°F (175°C) for about 5-10 minutes, or until the cheese is bubbly and the crust is crisp again. For an even quicker crisp, an air fryer at 325°F (160°C) for 3-5 minutes also works wonders. This ensures they maintain their delightful texture and inviting aroma, making them taste almost as good as fresh from the oven.
Frequently Asked Questions About Cheesy Breadsticks
Can I make the dough for these cheesy breadsticks ahead of time?
Absolutely! You can prepare the dough up to 24 hours in advance. After the first rise, punch it down gently, cover it tightly with plastic wrap, and refrigerate it. Let it come to room temperature for about 30 minutes before rolling it out and proceeding with the recipe.
What if I don’t have active dry yeast? Can I use instant yeast?
Yes, you can use instant yeast. The main difference is that instant yeast doesn’t require activation in warm water. You can typically mix it directly with the flour and other dry ingredients, then add the warm water and olive oil. Follow package instructions for specific ratios, but generally, use the same amount.
My breadsticks aren’t getting golden brown. What could be wrong?
Several factors could contribute to this. Your oven might not be reaching the correct temperature, so consider using an oven thermometer. Also, ensure you’re using melted butter on top, as this helps with browning. Baking on a lower rack might help, or extending the baking time by a few minutes, watching carefully.
Can I add other toppings to these savory breadsticks?
Definitely! Before adding the cheese, you could sprinkle a tiny bit of red pepper flakes for heat, dried oregano for extra Italian flavor, or even some very finely diced fresh jalapenos (deseeded) for a subtle kick. Cooked, crumbled beef or turkey sausage could also be a delicious addition for a heartier snack.
How do I get that perfect “cheese pull”?
The key to an epic cheese pull is using freshly shredded, low-moisture mozzarella cheese, as it melts beautifully and stretches well. Ensure your oven is hot enough to melt the cheese quickly without drying it out, and serve the breadsticks immediately while they are still warm and gooey.
Picture this: the evening descends, dinner is a distant memory, and a collective rumble echoes from the living room. It’s not thunder; it’s the undeniable craving for something truly delicious, deeply satisfying, and wonderfully cheesy. Forget sad crackers or neglected fruit bowls. Tonight, we’re embarking on a mission for culinary glory: to create something universally adored, ridiculously easy, and utterly irresistible. Get ready to bake a batch of Cheesy Breadsticks Everyone Loves because, let’s be honest, who could ever resist them?
I remember the first time I grasped the sheer power of a perfect cheesy breadstick. It wasn’t in a fancy restaurant; it was at a particularly boisterous family gathering. The main course was delayed, and hunger threatened to turn the crowd into a ravenous mob. In a moment of culinary inspiration, I whipped up these glorious breadsticks, crisp-edged and oozing with molten cheese. A hush fell, replaced only by happy munching. From that day, they became more than a snack; they were peacekeepers and mood-boosters. They are the undisputed champions of snack time, the gold medalists of deliciousness, and the heavyweight title holders of “can I have just one more?”
Unleashing the Magic: Why These Cheesy Breadsticks Rule
What makes these Cheesy Breadsticks Everyone Loves so special? Is it the perfectly chewy-on-the-inside, crisp-on-the-outside texture? Is it the intoxicating aroma of garlic and melted cheese, drawing everyone in like a cartoon character following a scent? Or is it simply the joy of pulling apart a warm, gooey stick, the cheese stretching tantalizingly before disappearing into your mouth? It’s a resounding ‘all of the above!’ These aren’t just breadsticks; they’re an experience. They’re a warm hug on a cold day, a high-five from your best friend, and finding a twenty-dollar bill in an old coat pocket, all rolled into one delightful package.
Crafting these delectable delights requires no advanced culinary degree or secret incantations. Their beauty lies in their simplicity, making them accessible for even the most novice of bakers. You’ll be surprised how quickly you can transform humble ingredients into a tray of golden, bubbling perfection. So, let’s ditch the intimidation and embrace the delicious chaos of homemade cheesy bread. Your taste buds, and your family, will profusely thank you, probably with a few cheesy grins of their own.
Gather Your Arsenal: Ingredients for Glorious Cheesy Breadsticks
Before we dive into the delicious details, let’s stock our kitchen arsenal. Think of these ingredients as your secret weapons, each crucial for maximum flavor and irresistible texture. No exotic supermarket expeditions; just good, honest, readily available bits and bobs. Quality ingredients make a noticeable difference, so choose wisely!
Doughy Foundations:
-
1 ½ cups warm water(105-115°F / 40-46°C): Just right to wake up our sleepy yeast.
-
2 ¼ teaspoons active dry yeast(one standard packet): The tiny magic makers for light and fluffy breadsticks.
-
1 teaspoon granulated sugar:A little snack for our yeast friends.
-
3 ½ to 4 cups all-purpose flour:The backbone of our breadsticks. Add more if needed until the dough is manageable.
-
2 tablespoons olive oil:For richness, tenderness, and a lovely golden crust.
-
1 teaspoon salt:Essential for flavor, preventing blandness.
Cheesy & Flavorful Toppings:
-
2 cups shredded mozzarella cheese:The quintessential gooey superstar. Freshly shredded melts best!
-
½ cup grated Parmesan cheese:For that salty, nutty punch.
-
¼ cup unsalted butter, melted:Our flavorful glue for garlic and herbs.
-
3 cloves garlic, minced:Don’t be shy; garlic is our best friend!
-
1 tablespoon dried Italian seasoning:A fragrant blend of herbs that screams “delicious.”
-
½ teaspoon red pepper flakes (optional):For a gentle, warming kick, entirely optional.
-
Fresh parsley, chopped (for garnish):A sprinkle of green for visual appeal and freshness.
The Grand Performance: Step-by-Step Cheesy Breadstick Extravaganza
Alright, ovens preheated, aprons tied, and spirits high! Let’s get these Cheesy Breadsticks Everyone Loves into the world. Follow these steps for cheesy bliss faster than you can say “extra dip, please!”
Act 1: The Dough Awakens
-
Activate the Yeast:In a large bowl, combine warm water, yeast, and sugar. Stir and let sit 5-10 minutes until foamy – our yeast army is waking up!
-
Mix the Dough:Add olive oil and salt to the yeast mixture. Gradually add 3 ½ cups flour, mixing until a shaggy dough forms. Add remaining flour, if needed, until the dough pulls from the bowl and is slightly tacky.
-
Knead for Glory:Turn dough onto a lightly floured surface. Knead for 5-7 minutes until smooth and elastic. If using a stand mixer, knead for about 5 minutes.
-
First Rise (The Beauty Sleep):Lightly oil a clean bowl. Place dough in bowl, turning to coat. Cover and let rise in a warm place for 60-90 minutes, or until doubled in size.
Act 2: Shaping and Flavoring the Stars
-
Prep Your Stage:While dough rises, preheat oven to 400°F (200°C). Lightly grease a large baking sheet or line with parchment paper.
-
Punch Down and Roll Out:Once doubled, gently punch down dough. Transfer to a lightly floured surface and roll into a 10×15 inch (25×38 cm) rectangle, aiming for even thickness.
-
Garlic Butter Bliss:In a small bowl, combine melted butter, minced garlic, Italian seasoning, and red pepper flakes (if using). Brush about half of this mixture evenly over the rolled-out dough. This infuses flavor early!
-
Cheese Avalanche:Sprinkle shredded mozzarella and grated Parmesan cheese evenly over the buttered dough. Don’t be shy; aim for maximum cheesiness!
Act 3: Baking to Perfection
-
Slice and Bake:Using a pizza cutter or knife, slice dough into roughly 1-inch (2.5 cm) wide strips. Transfer strips to your prepared baking sheet, leaving space between them.
-
The Grand Finale:Bake for 12-18 minutes, or until golden brown around the edges, puffed, and the cheese is bubbly. Keep an eye on them!
-
Final Flourish:Immediately brush the remaining garlic butter mixture over the hot breadsticks. Garnish with fresh chopped parsley if desired.
-
Serve and Conquer:Let them cool for a few minutes before serving. These Cheesy Breadsticks Everyone Loves are best warm, perhaps with marinara sauce. Prepare for instant adoration!
Perfecting the Cooking Process

To achieve peak deliciousness, always activate yeast first to ensure it’s lively. Knead the dough until smooth for an optimal chewy texture. Preheating your oven correctly guarantees a crispy exterior and perfectly melted cheese. Brushing with garlic butter after baking adds incredible flavor and shine, making these breadsticks truly irresistible.
Add Your Touch
Feeling adventurous? Swap mozzarella for provolone and cheddar for a different cheesy profile. Add everything bagel seasoning before baking for extra crunch. For an herbier kick, incorporate fresh rosemary or thyme into your garlic butter mixture, making these savory breadsticks uniquely yours.
Storing & Reheating
Store cooled breadsticks in an airtight container at room temperature for up to two days, or refrigerate for four. Reheat them in a preheated oven at 350°F (175°C) for 5-8 minutes until warmed and bubbly. Avoid the microwave for best texture and crispness.
My grandmother once famously declared, “A happy kitchen is a messy kitchen, especially when cheese is involved!” These breadsticks always brought smiles, even if it meant a few stray cheese strands clinging to the counter. It reminds me how simple, hearty food connects us all.
Chef’s Secrets for Ultimate Cheesy Breadstick Nirvana
-
Don’t Rush the Rise:Give your dough ample time to rise in a warm spot. This patience results in lighter, fluffier breadsticks with a superior texture that truly impresses.
-
Shred Your Own Cheese:Pre-shredded cheese often contains anti-caking agents that hinder melting. Grate your own mozzarella and Parmesan for the ultimate gooey, stretchy, melt-in-your-mouth experience.
-
Butter Up Twice:Brushing garlic butterbeforethe cheese layers the flavor, and againafterbaking creates an aromatic, shiny finish. This double buttering technique is a game-changer for these cheesy breadsticks.
Frequently Asked Questions About Cheesy Breadsticks Everyone Loves
Can I make the dough ahead of time?
Yes, prepare the dough through the first rise, then refrigerate for up to 24 hours. Allow it to reach room temperature for 30 minutes before rolling and baking.
What kind of marinara sauce pairs best?
A classic, slightly sweet marinara sauce is ideal. Use your favorite store-bought brand or make a quick homemade version with crushed tomatoes, garlic, and basil.
Can I use whole wheat flour?
You can substitute up to half of the all-purpose flour with whole wheat flour for a nuttier flavor and added fiber. The breadsticks will be slightly denser.
How do I keep the breadsticks from getting tough?
Avoid over-kneading or over-baking. Knead just until smooth and elastic. Watch the oven carefully; they should be golden brown, not dark, for tenderness.
Are these suitable for freezing?
Yes, freeze baked breadsticks by cooling completely, then placing them in a single layer until solid. Transfer to a freezer-safe bag for up to 2 months. Reheat in the oven from frozen.
The Final Verdict: Cheesy Breadsticks Everyone Loves Are Here to Stay
There you have it, folks! A recipe so straightforward, so utterly delicious, it’s practically illegal. These Cheesy Breadsticks Everyone Loves aren’t just a snack; they’re a celebration, a comfort, and a guaranteed way to bring smiles. Whether hosting a game night, pacifying hungry teenagers, or treating yourself, this recipe will quickly become a cherished part of your culinary repertoire. Go forth and bake! May your cheese always be gooey, your garlic potent, and your breadsticks eternally golden. Happy baking, and happy munching!
Conclusion for Cheesy Breadsticks Everyone Loves
And there you have it, folks! From a simple ball of dough to a pan of golden, gooey perfection, making Cheesy Breadsticks Everyone Loves is an adventure in pure culinary joy. This recipe isn’t just about combining ingredients; it’s about crafting moments, sharing laughter, and creating memories around a snack that truly lives up to its name. Whether you’re feeding a hungry crowd or simply treating yourself, these irresistible breadsticks promise satisfaction with every warm, cheesy pull. So go ahead, whip up a batch, and experience why these delightful, savory treats are universally adored and always disappear far too quickly!
FAQs
Why are Cheesy Breadsticks Everyone Loves such a popular snack?
There’s a magical alchemy that happens when warm, fluffy dough meets gooey, melted cheese, and that’s precisely why Cheesy Breadsticks Everyone Loves are an undeniable crowd-pleaser. They strike the perfect balance between comfort food and pure indulgence, making them irresistible at parties, movie nights, or as a delightful side to any meal. Their simple yet profoundly satisfying flavor profile appeals to all ages, guaranteeing smiles and contented sighs with every cheesy bite. It’s the ultimate edible hug for your taste buds, truly a universally adored treat that never disappoints.
Can I prepare the dough for these delicious cheesy breadsticks ahead of time?
Absolutely, planning ahead is a secret weapon for any home cook, and these cheesy breadsticks are wonderfully cooperative! You can prepare the dough up to 24 hours in advance. After kneading, simply place it in an oiled bowl, cover it tightly with plastic wrap, and let it chill in the refrigerator. This slow, cold proofing can even enhance the dough’s flavor, developing a more complex taste profile. When you’re ready to bake, just pull it out, let it come to room temperature for about 30-60 minutes, and then proceed with shaping and baking as usual. Talk about convenience!
What kind of cheese works best for Cheesy Breadsticks Everyone Loves?
For the ultimate melt factor and irresistible stretchiness, a low-moisture mozzarella is usually the reigning champion when it comes to Cheesy Breadsticks Everyone Loves. Its mild flavor lets the dough shine while providing that classic cheesy pull. However, don’t be afraid to experiment! A blend of mozzarella and a sharp cheddar can add a tangy depth, while a sprinkle of finely grated Parmesan or Pecorino Romano before baking can introduce a lovely salty, nutty crust. Provolone is another excellent choice for its melting qualities. The goal is gooey perfection, so aim for cheeses known for their excellent melt.
How can I make Cheesy Breadsticks Everyone Loves even more flavorful?
Turning up the flavor dial on your cheesy breadsticks is easier than you think! Before baking, consider brushing the shaped dough with garlic-infused olive oil – a simple trick that adds a punch of savory goodness. A sprinkle of dried Italian herbs like oregano and basil, or even a pinch of red pepper flakes for a subtle kick, can elevate the experience. For an extra layer of yum, after they come out of the oven, brush them with a melted butter and fresh minced garlic mixture, then finish with a dusting of fresh parsley. These small additions transform a great snack into an unforgettable culinary adventure.

Leave a Comment