
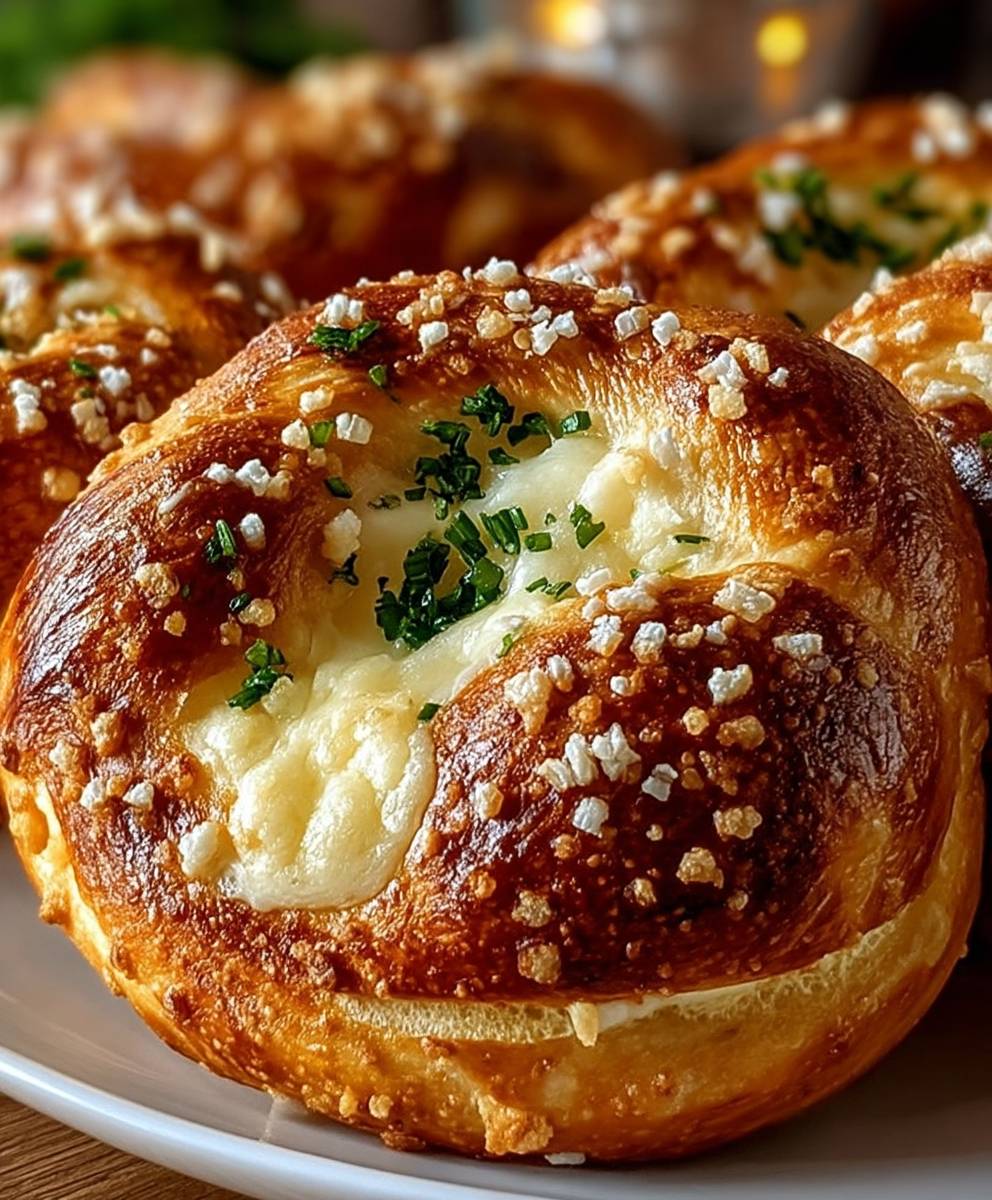
Imagine the smell of warm, yeast-raised dough mingling with bubbling cheddar. Life is too short for boring snacks, which is why we created the ultimate solution to weeknight cravings and party platter panic. Get ready to meet your new obsession: theCheese Stuffed Pretzel Snack: A Deliciously Cheesy Treatthat promises crunchy outsides and gooey, cheesy centers you simply cannot resist.
- Effortlessly elevate your snack game with simple pantry ingredients and surprisingly easy folding techniques perfect for beginner bakers.
- Experience a flavor explosion featuring savory, salty pretzel crust contrasted perfectly with a deeply creamy and molten three-cheese filling.
- These golden-brown spirals possess an irresistible rustic charm, making them the most visually appealing appetizer or game-day centerpiece.
- This recipe is incredibly versatile; customize the filling with your favorite seasonings or serve them alongside marinara or ranch dipping sauces.
Ingredients for Cheese Stuffed Pretzel Snack: A Deliciously Cheesy Treat
Here’s what you’ll need to make this delicious dish:
- All-Purpose FlourThis forms the foundational structure of the soft pretzel dough; make sure to measure it accurately using the scoop and level method.
- Active Dry YeastEssential for creating that light, airy texture and characteristic rise, ensuring a wonderfully chewable interior.
- Warm Water and MilkThe liquid base activates the yeast and keeps the dough pliable and soft; ensure the temperature is around 105°F to 115°F.
- Granulated SugarA small amount feeds the yeast, helping the dough proof vigorously and adding a subtle balance to the salty exterior.
- Salted ButterAdds richness and tenderness to the dough structure; use room temperature butter for easier incorporation during kneading.
- Baking SodaUsed in the crucial boiling step, this creates the high-alkaline environment necessary for the classic dark brown crust and unmistakable pretzel flavor.
- Mozzarella CheeseThe star of the stuffing, chosen for its excellent melt factor and mild, creamy flavor profile.
- Sharp Cheddar CheeseProvides a necessary punch of savory depth and color to the otherwise mild mozzarella mixture.
- Cream CheeseHelps stabilize the cheese filling, preventing it from leaking excessively during baking while adding luxurious creaminess.
- Egg WashA simple beaten egg brushed onto the pretzels before baking ensures they achieve that deep, golden-brown shine.
The full ingredients list, including measurements, is provided in the recipe card directly below.
How to Make Cheese Stuffed Pretzel Snack: A Deliciously Cheesy Treat
Follow these simple steps to prepare this delicious dish:
Step 1: Preparing the Yeast and Mixing the Dough
Activate the yeast by combining it with warm water, warm milk, and sugar in a large bowl; allow it to sit for about five minutes until it froths enthusiastically. Once foamy, stir in the melted butter and salt, then gradually incorporate the flour until a shaggy dough forms. Turn the mixture out onto a lightly floured surface and knead it vigorously for six to eight minutes until it becomes smooth and elastic.
Step 2: Proofing and Resting the Pretzel Dough
Place the kneaded dough ball into a lightly oiled bowl, turning it once to coat the entire surface, then cover the bowl tightly with plastic wrap. Set the bowl in a warm, draft-free spot for 60 to 90 minutes, allowing the dough to double in size, indicating it is ready for the next phase. While the dough proofs, preheat your oven to 425°F (220°C) and prepare your cheese filling by mixing the mozzarella, cheddar, and cream cheese thoroughly in a separate bowl.
Step 3: Stuffing and Shaping the Dough
Punch down the proofed dough gently to release the air and divide it into eight equal portions. Roll each portion into a long, thin rope, approximately 18 to 20 inches long; gently flatten the rope to create a wide strip ready for filling. Place a generous line of the creamy cheese mixture down the center of the flattened dough strip, then fold the edges over the cheese and pinch them firmly to seal the seam completely. Carefully twist the stuffed rope into the classic pretzel shape, ensuring the ends overlap slightly.
Step 4: The Alkaline Bath (Boiling)
This step is non-negotiable for achieving authentic pretzel texture and color. Bring eight cups of water to a rolling boil in a wide, shallow pot, then dissolve the baking soda carefully into the water (be aware it will foam up significantly). Gently drop one or two stuffed pretzels into the boiling solution for exactly 30 seconds, flipping halfway through the process. Remove the pretzels with a slotted spoon, allowing excess water to drain completely, and place them immediately onto a baking sheet lined with parchment paper.
Step 5: Baking to Golden Perfection
Brush the boiled pretzels thoroughly with the prepared egg wash and sprinkle the tops liberally with coarse sea salt. Transfer the baking sheet to the preheated oven and bake for 12 to 15 minutes, or until the pretzels achieve a deep, golden-brown hue and the cheese filling is bubbling tantalizingly inside. Transfer to plates and serve immediately while the cheese is gloriously molten for the perfect finishing touch.
The Secret History of the Soft Pretzel: Why We Love Cheesy Filled Pretzels
The soft pretzel is not just a snack; it is an institution, particularly in places like Pennsylvania and Germany. Tracing its origins back centuries, the pretzel shape is often attributed to European monks who used the dough scraps to create a treat resembling arms crossed in prayer. This history lends a certain charm to every bite, though I highly doubt those early monks were stuffing them with three kinds of cheese. We are simply modernizing a classic, adding a layer of contemporary indulgence to an old-world favorite.
The Science of the Perfect Crust
You might wonder why we need to boil the dough in baking soda water before baking. This seemingly odd step is the most critical difference between standard bread and a pretzel. Baking soda raises the pH level of the water significantly, creating an alkaline solution. When the raw dough hits this hot alkaline bath, it accelerates the Maillard reaction during baking, which is the chemical process responsible for deep browning and complex flavor development. This reaction gives the pretzel its distinct color, crispy exterior, and the characteristic slightly chewy texture we all adore. Skipping this step means you are essentially just making cheesy filled bread rolls, which is fine, but it is certainly not aCheese Stuffed Pretzel Snack: A Deliciously Cheesy Treat.
Mastering the Twist and Avoiding the Blowout
The biggest challenge when making stuffed pretzels is preventing the creamy filling from exploding out during the alkaline bath or the baking process. If your cheese leaks out, it creates a messy baking sheet and leaves you with half-empty pretzels—a culinary tragedy indeed. Luckily, there are a few simple tricks to ensure your stuffed dough bites remain perfectly intact.
Preventing Cheese Leakage: Essential Dough Tips
The secret lies entirely in the sealing process. When you place the cheese mixture into the flattened dough rope, you must fold the edges completely over the filling and pinch the seam with determination. Think of it like sealing a crucial envelope; if the seal is weak, the contents will spill out under pressure.
- Use Minimal Filling:Overstuffing is the number one culprit for blowouts. Use just enough cheese to line the center, leaving plenty of dough margin on both sides for a secure pinch.
- Ensure a Strong Seam:After folding the dough over the filling, use a tiny bit of water on your fingertips to moisten the edges where they meet, then pinch them tightly together. Roll the stuffed rope gently between your hands to further blend and seal the seam completely.
- Maintain Dough Temperature:If the cheese filling is too warm, it will soften the dough prematurely, making it prone to tearing. Use chilled cheese and work quickly so the dough maintains its structure.
This attention to detail ensures that the savory pretzel pockets achieve their ideal shape and retain their magnificent, gooey centers, ready to deliver that burst of flavor when you bite in.
Creative Variations and Delicious Dipping Companions
While the classic mozzarella, cheddar, and cream cheese combination is fantastic, this cheesy filled pretzel recipe provides the perfect canvas for culinary experimentation. You can easily adapt the filling to suit different tastes or the occasion.
Exciting Filling Alternatives
If you are looking to amp up the flavor profile, consider these savory options for your stuffed pretzel snack:
- Spicy Jalapeño Cheddar:Add a teaspoon of finely diced pickled jalapeños or a pinch of cayenne pepper to the cheese mix for a fiery kick.
- Garlic Herb Feta:Swap out the cheddar for crumbled feta cheese and mix it with dried oregano, basil, and a teaspoon of garlic powder for a Mediterranean twist.
- Caramelized Onion and Gruyere:Incorporate deeply caramelized sweet onions into the cheese blend for an elegant, umami-rich filling that feels very gourmet.
- Buffalo Ranch Chicken (Non-Spicy):Add 1/4 cup of finely shredded, cooked chicken breast mixed with a tablespoon of ranch seasoning (ensure the chicken is diced very small to prevent sharp bones or edges from tearing the dough).
Perfect Sauces for Dipping
Every great pretzel needs a partner in crime, and dipping sauces are essential for maximizing the snack experience. Serve a flight of these sauces alongside your warm pretzel treats:
- Classic Marinara Sauce: A warm, savory classic that pairs wonderfully with the mozzarella filling, reminiscent of pizza.
- Tangy Honey Mustard: The sharp tanginess and sweetness cut through the richness of the cheese, offering a refreshing contrast.
- Creamy Ranch Dressing: A cool, herbaceous dip that provides a soothing counterpoint, especially if you opted for a spicy filling variation.
- Roasted Garlic and Olive Oil Dip: Simple yet sophisticated, this dip adds deep, savory flavor without overpowering the cheese.
By introducing these variations, you ensure that every batch of your delicious cheesy treat offers a slightly new and exciting experience, keeping your guests thoroughly impressed.
Troubleshooting Common Pretzel Dough Issues
Even experienced bakers occasionally face issues with yeast dough. Knowing how to identify and fix these common problems will ensure your batch ofCheese Stuffed Pretzel Snack: A Deliciously Cheesy Treatturns out perfectly every time.
My Dough Didn’t Rise
If your dough stays stubbornly flat, the issue is likely dead yeast. This usually happens if the water temperature was too hot (killing the yeast) or too cold (preventing activation). Always ensure the water is between 105°F and 115°F. Another common cause is forgetting the sugar, which is the necessary food source for yeast activation. If the yeast doesn’t foam after five minutes, start over with fresh yeast and correct temperature water.
The Crust is Pale, Not Brown
If your baked pretzels lack that signature deep brown color, you probably skipped the critical boiling step or did not leave them in the alkaline solution long enough. Remember, 30 seconds is mandatory. Alternatively, you might have omitted the egg wash, which provides essential proteins and fats to promote rich color development during baking. For a darker crust, you can also increase the baking soda slightly (but carefully) in the boiling water.
Frequently Asked Questions About Stuffed Pretzels
Can I prepare the dough ahead of time?
Yes, you can absolutely make the dough the day before. After the initial kneading (Step 1), place the dough in an oiled bowl, cover it tightly, and refrigerate it for up to 24 hours. When ready to use, remove the dough and let it sit at room temperature for about 30 minutes before punching it down and proceeding to the shaping and stuffing steps.
What is the best type of salt to use on pretzels?
The best salt is coarse sea salt or pretzel salt. These types of salt have large, visible crystals that adhere well to the wet dough after the egg wash and provide that unmistakable, savory crunch without dissolving into the crust during baking.
Can I freeze the stuffed pretzels?
You can freeze them in two ways: first, after they are boiled and shaped (before the egg wash and salt), lay them on a baking sheet and freeze until solid, then transfer to a freezer bag. Bake from frozen, adding 5 to 7 minutes to the bake time. Alternatively, you can freeze fully baked pretzels and reheat them later in a 350°F (175°C) oven until warmed through and crispy again.
Why is cream cheese necessary in the filling?
Cream cheese is essential because it adds stability and fat to the mozzarella and cheddar blend. This prevents the filling from becoming excessively runny when heated, ensuring the cheese stays inside the pretzel pocket rather than leaking out onto the baking sheet.
My relationship with snacking is complex. It’s less of a gentle friendship and more of a passionate, demanding affair that usually begins around 3 PM and requires immediate, carbohydrate-heavy attention. For years, I chased the perfect blend of soft, chewy texture and molten, savory filling—a handheld masterpiece that didn’t require cutlery or dignity. I tried everything from grilled cheese (too flat) to calzones (too ambitious). Then, I remembered the pretzel.
The pretzel is pure genius: salty, slightly sweet, and gloriously chewy. But why stop at the exterior? Why not invite the party inside? That’s how I stumbled upon the ultimate kitchen revelation: creating the perfectCheese Stuffed Pretzel Snack: A Deliciously Cheesy Treat. These aren’t just snacks; they are portable pockets of joy, perfect for game nights, movie marathons, or simply hiding in the pantry and eating three before dinner.
Dough work often scares people, invoking visions of messy counters and failed rises. But trust me, this recipe for these cheesy morsels is surprisingly straightforward, even if your yeast usually treats you with disdain. The secret lies in the quick, crucial bath in a mild alkaline solution (don’t worry, it’s just baking soda!) which gives the pretzels that unmistakable, deep mahogany crust and chewy interior. Once you master the pretzel roll, stuffing it with a glorious mixture of sharp cheddar and tangy cream cheese is simply the delicious icing on the salty cake.
The Quest for the Ultimate Cheesy Center
Before we dive into the dough dynamics, we need to discuss the star of the show: the filling. We are aiming for a cheese core that holds its shape enough to be stuffed, but completely melts into a comforting lava flow when baked. Using a mixture of sharp, grated cheese (like cheddar or Gruyère) combined with cream cheese ensures stability and that signature creamy texture. If you skip the cream cheese, the filling often leaks out in the oven, leading to what I affectionately call “Cheesy Tragedy.” Nobody wants a cheesy tragedy on their hands.
When preparing the dough, remember that temperature matters greatly. Yeast loves warmth, but extreme heat kills it faster than a plot twist ruins a predictable movie. Aim for water that feels like a pleasant, warm bath—about 105 to 110 degrees Fahrenheit. This step, known as proofing, is your first test of patience, but watching the yeast foam up like a tiny cappuccino is incredibly satisfying. Once the dough has doubled in size, the real fun begins: shaping and stuffing these delectable treats.
Ingredients You Will Need
Gathering your mise en place before starting the baking journey saves you from that frantic mid-knead realization that you are out of salt. For this recipe, precision in measurements helps, especially with the flour, so grab those measuring cups!
For the Dough
- 1 ½ cups warm water (105–110°F)
- 2 ¼ teaspoons active dry yeast
- 1 teaspoon granulated sugar
- 4 ½ cups all-purpose flour
- 2 teaspoons salt
- 4 tablespoons melted butter (unsalted)
For the Alkaline Bath & Topping
- 10 cups water
- ⅔ cup baking soda
- 1 large egg, beaten (for egg wash)
- Coarse pretzel salt or flaky sea salt
For the Cheesy Filling
- 8 ounces sharp cheddar cheese, grated
- 4 ounces cream cheese, softened
- ½ teaspoon garlic powder
- Pinch of black pepper
Step-by-Step Instructions for the Perfect Pretzel Snack
Follow these steps closely to ensure your pretzels are chewy on the outside and wonderfully gooey inside. This process transforms simple ingredients into a truly satisfying snack.
Making and Proofing the Dough
- In a large bowl, combine the warm water, yeast, and sugar. Let it sit for 5 to 10 minutes until foamy. If it doesn’t foam, your yeast is likely expired, and you need a fresh batch!
- In a separate bowl, whisk together the flour and salt. Add the dry mixture and the melted butter to the yeast mixture.
- Mix until a shaggy dough forms, then turn it out onto a lightly floured surface. Knead for 5 to 8 minutes until the dough is smooth and elastic. It should spring back lightly when poked.
- Place the dough in a lightly oiled bowl, turning to coat. Cover with plastic wrap and let it rise in a warm spot for about 60 to 90 minutes, or until doubled in size.
Shaping and Stuffing the Treats
- Punch the risen dough down gently and divide it into 12 equal pieces. Roll each piece into a ball.
- Flatten one dough ball into a disk roughly 4 inches wide. Place about 1 ½ tablespoons of the cheesy filling mixture (ensure the cheddar and cream cheese are well combined beforehand) in the center.
- Carefully pinch the edges of the dough together over the filling, sealing it completely. Roll the stuffed ball between your palms to ensure a smooth, round seal. Repeat with the remaining dough and filling.
- Place the stuffed pretzel balls on a parchment-lined baking sheet, ensuring they have room to breathe, and freeze them for 15 minutes. This firming step helps them maintain their shape during the bath.
The Crucial Bath and Bake
- Preheat your oven to 425°F (220°C). Prepare two baking sheets with parchment paper.
- Bring the 10 cups of water and baking soda to a rolling boil in a large, wide pot. This creates the alkaline solution necessary for the classic pretzel flavor and color.
- Working in batches (do not crowd the pot!), drop the frozen pretzel balls into the boiling bath. Boil for 30 seconds, flipping halfway through. Do not exceed 30 seconds, or the pretzels will taste metallic.
- Carefully remove the pretzels using a slotted spoon, allowing excess water to drain, and place them on the prepared baking sheets.
- Brush the tops with the egg wash and immediately sprinkle generously with coarse salt.
- Bake for 12 to 15 minutes, or until deeply browned and irresistibly glossy. Serve these delicious cheesy treats warm.
I distinctly remember the first time I made these for a casual Sunday gathering. My notoriously picky cousin devoured three of these cheesy morsels before anyone else even sat down. The silent approval was deafening.
Chef’s Insider Tips for Supreme Success
- Always use high-quality, freshly grated cheese instead of pre-shredded varieties, as they melt smoother without any starchy residue.
- The freezing step is non-negotiable; it prevents the soft dough from collapsing or tearing when submerged in the boiling alkaline bath.
- If you prefer a darker crust, add one tablespoon of brown sugar or malt powder to the boiling baking soda water for enhanced browning.
Perfecting the Cooking Process

The sequence for maximum efficiency starts with proofing the yeast and kneading the dough first, allowing it adequate time to rise while you prepare the cheesy filling. Once stuffed, use the 15-minute freezing period to heat the oven and bring the alkaline bath solution to a vigorous boil, ensuring a seamless transition from freezer to pot to oven.
Add Your Touch
To personalize these savory pockets, try swapping sharp cheddar for smoked Gouda or pepper jack for a little kick. You can also mix in finely chopped chives or dried dill into the cheese filling for an herby twist. For the exterior, brush with garlic butter immediately upon exiting the oven instead of using the egg wash.
Storing & Reheating
Store leftover, fully cooled pretzel snacks in an airtight container at room temperature for up to two days. To reheat and restore their delightful chewiness, mist them lightly with water and bake them in a preheated 350°F oven for 5 to 7 minutes until warmed through and slightly crisp on the outside.
Troubleshooting Common Pretzel Pitfalls
Even seasoned bakers occasionally face hurdles, especially when dealing with the unique chemistry of pretzel dough. Knowing how to solve these issues ensures your ultimate goal—a perfectCheese Stuffed Pretzel Snack: A Deliciously Cheesy Treat—is realized every time.
Why is my dough tough and dense?
A tough dough is usually the result of using too much flour or over-kneading, which overdevelops the gluten. Ensure you measure flour accurately and stop kneading as soon as the dough becomes smooth and elastic, not sticky. Also, verify that your yeast is active, as inactive yeast results in poor rise and dense results.
How do I prevent the cheese from leaking?
The key to a non-leaking pretzel bomb is a meticulous seal. When pinching the edges of the dough over the filling, make sure there are absolutely no gaps or holes. Rolling the sealed ball lightly helps meld the seams together. Additionally, freezing the stuffed balls briefly firms up both the dough and the filling, reducing the chances of rupture during the boiling process.
Another factor is the consistency of the cheese filling itself. If the cream cheese is too warm or the filling is too loose, it will exert more pressure on the dough wall. Make sure the cream cheese is only slightly softened and mixed well with the grated cheddar to create a thick, moldable mass.
Pretzel Pairings: What to Serve with Your Cheesy Snack
While these pretzel treats are undeniably magnificent on their own, a good dipping sauce elevates them from a stellar snack to an unforgettable experience. Think about contrasting the rich, salty cheese core with something sharp, tangy, or slightly spicy.
Suggested Dipping Sauces
- Tangy Mustard Dip:Mix equal parts Dijon mustard, honey, and a splash of apple cider vinegar. The acidity cuts through the richness beautifully.
- Savory Ranch Dressing:A cool, herby dip offers a classic, comforting complement.
- Quick Marinara:A slightly warmed, simple tomato sauce adds a touch of Italian flair, reminiscent of pizza pockets.
- Creamy Chive Dip:Blend sour cream with finely chopped chives and a squeeze of fresh lemon juice for a bright, fresh counterpoint.
These cheesy parcels are also fantastic served alongside a hearty soup or chili, transforming them into a sophisticated side rather than just a standalone snack. They provide a satisfying chew and a rich flavor that pairs well with robust, savory main courses, especially those featuring roasted chicken or slow-cooked beef.
Frequently Asked Questions about Baking Stuffed Pretzels
Is it safe to boil food in baking soda water?
Yes, boiling pretzels briefly in a mild solution of baking soda is completely safe and necessary for developing the characteristic pretzel crust, color, and chewiness. This process, called lye bathing in traditional German baking, is made safer for the home kitchen by using baking soda instead of harsh chemical lye.
Can I prepare the dough ahead of time?
Absolutely! You can prepare the dough up to the kneading stage, place it in an oiled bowl, cover it tightly, and refrigerate it overnight (up to 24 hours). The cold temperature slows the rise. Before shaping, let the dough sit at room temperature for about 30 minutes to warm up slightly and finish rising before punching it down and dividing it.
What is the difference between coarse salt and pretzel salt?
Pretzel salt is a specific, non-melting, large, granular salt (often large pieces of crushed rock salt) designed to stick perfectly to the pretzel surface through the baking process without dissolving. While coarse sea salt works well and provides a great crunch, true pretzel salt provides superior coverage and visual appeal, making yourCheese Stuffed Pretzel Snacklook truly professional.
Mastering this recipe not only guarantees you the most satisfying cheesy snack imaginable but also gives you a fantastic party trick. Say goodbye to boring chips and hello to your new favorite delightfully cheesy treat. Happy baking!
Conclusion for Cheese Stuffed Pretzel Snack: A Deliciously Cheesy Treat
You have successfully mastered the art of creating the ultimate comfort food experience: theCheese Stuffed Pretzel Snack: A Deliciously Cheesy Treat. This recipe proves that homemade snacks don’t need to be complicated to be truly extraordinary. From the satisfying chew of the perfectly baked crust achieved via the vital baking soda bath, to the burst of warm, gooey cheese inside, every bite delivers pure culinary joy. Whether you serve these savory delights at your next gathering or hoard them selfishly for movie night (we certainly won’t judge), remember that fresh, hot pretzels always win. Go forth and enjoy the golden, salty perfection of your cheesy creations!
FAQs
How should I store and reheat this cheesy pretzel treat to keep the dough soft?
Storing theCheese Stuffed Pretzel Snack: A Deliciously Cheesy Treatcorrectly ensures that future snacking is just as good as the first bite. Let the pretzels cool completely, then place them in an airtight container or freezer bag. If you plan to eat them within two days, refrigeration works well. For longer storage (up to three months), freezing is best. When reheating, avoid the microwave, which turns them rubbery and tough. Instead, wrap them loosely in foil and bake at 350°F (175°C) for about 8–10 minutes until the cheese is melted and gooey again. This method revives the soft, delicious texture we crave.
Can I add extra ingredients to the filling besides the cheese?
Absolutely! While the basic recipe for this delicious pretzel snack emphasizes the pure, comforting gooeyness of melted cheese, you have endless opportunities for customization. Try mixing in finely chopped jalapeños for a spicy kick, or incorporate some dried herbs like oregano and thyme for an Italian twist. If you prefer a protein boost, a small amount of finely shredded cooked chicken or crumbled cooked ground beef works wonderfully. Remember not to overstuff the pretzels, as too much filling will cause them to burst open during the baking process, releasing all that wonderful cheesy goodness onto the baking pan.
Why is the baking soda bath crucial for achieving the classic pretzel texture?
The baking soda bath is the magical step that transforms a basic yeast dough into a true pretzel masterpiece. When you quickly dip the dough into the simmering alkaline solution, it instantly raises the pH level on the surface of the pretzel. This high pH environment is what encourages the Maillard reaction during baking, resulting in that deep, mahogany-brown crust and the signature distinctively savory, slightly metallic flavor that pretzel aficionados adore. Skipping this step means you simply end up with a pale bread roll shape rather than the chewy exterior characteristic of a perfect pretzel snack. Don’t skip the bath—it’s where the classic pretzel flavor lives!
Is making the dough for this Cheese Stuffed Pretzel Snack difficult for beginner bakers?
Not at all! While working with yeast dough might initially sound intimidating, the process for thisCheese Stuffed Pretzel Snack: A Deliciously Cheesy Treatis straightforward and forgiving. We use a simple, stable dough that doesn’t require excessive kneading or complicated techniques. The biggest challenge is often the shaping—ensuring the cheese filling remains fully sealed inside—but even imperfectly shaped pretzels taste amazing. Focus on allowing enough time for the dough to rise in a warm spot and make sure your yeast is fresh. If the dough seems too sticky, gradually add a little more flour, but remember that slightly tacky dough usually yields the softest final result.

Leave a Comment